Focussed Abdominal Sonography in Trauma (FAST) is a well validated and widely utilised clinical skill.
The 'e' refers to the 'extended' examination which included sonographic evaluation of the thoracic cavity.
You should be able to:
- Understand the indications of eFAST
- Recognise the limitations of eFAST
- Identify normal chest and abdominal anatomy
- Recognise the presence of free fluid in the chest and abdomen
- Recognise a Pneumothorax
- Develop a systemic approach to an eFAST
Introduction
As with all ultrasound applications, familiarity with:
- Technique
- Patient anatomy
- Knowledge of common pitfalls
- Appreciating technical limitations
Are essential steps in a steady learning curve
In general (and certainly not when you're beginning), the eFAST exam is not “FAST” – it can take a few minutes to perform.
The patient should be supine, with a low frequency probe, Curvilinear
The 'ECHO" Phased array probe can provide the additional benefit of visualizing between the ribs & getting into the sub xiphoid region more easily for the cardiac view and the Linear probe can make the lung/PTX views easier.
Even with the best technique, the FAST scan will only visualize 25 ml or more of thoracic free fluid and 200ml or more of intraperitoneal free fluid.
INTRODUCTORY SONOSITE HOW TO EFAST VIDEOS

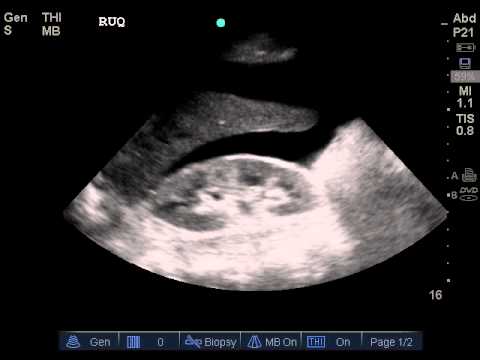
The RUQ is the most sensitive region for free fluid in comparison to the other eFAST views.
The RUQ should be divided into 3 zones.
1. Above/Below the diaphragm,
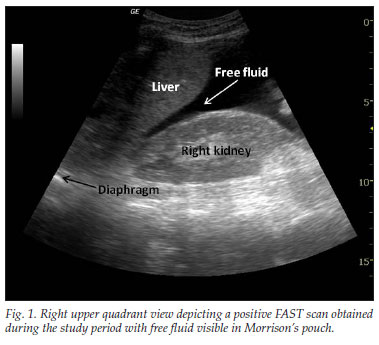
2. Morrison’s pouch (hepato-renal recess)
3. Para-colic gutter: Around the inferior hepatic edge/inferior pole of kidney
The key is to know your landmarks, and STOP, STAY and widely FAN through each zone well, adjusting your depth as necessary to keep the area of interest centered on your screen.
Start high to stay and fan (anterior to posterior) around the diaphragm. Then, SLIDE down into another rib space, stop, stay and fan around the entire kidney. An additional rib space may be necessary to evaluate the para-colic gutter.
Tips for RUQ Diaphragm View :
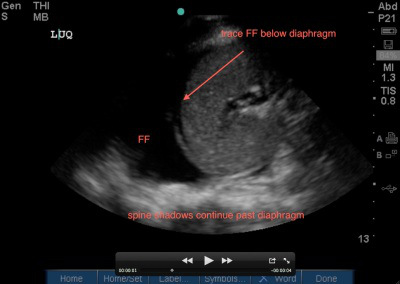
The liver may be easily seen, but the diaphragm can be more difficult, especially if it’s behind a rib shadow, inspiration views can help. This lowers the diaphragm into your view and allows visualization of the thoracic cavity for haemothorax/pleural fluid as well as sub-diaphragmatic peritoneal fluid.
Visualization of the spine shadow traveling in the lower part of the screen will normally stop at the diaphragm with a mirror image artifact illustrated in the thoracic cavity. However if the spine is able to be seen above the diaphragm...this is suggestive of pleural fluid


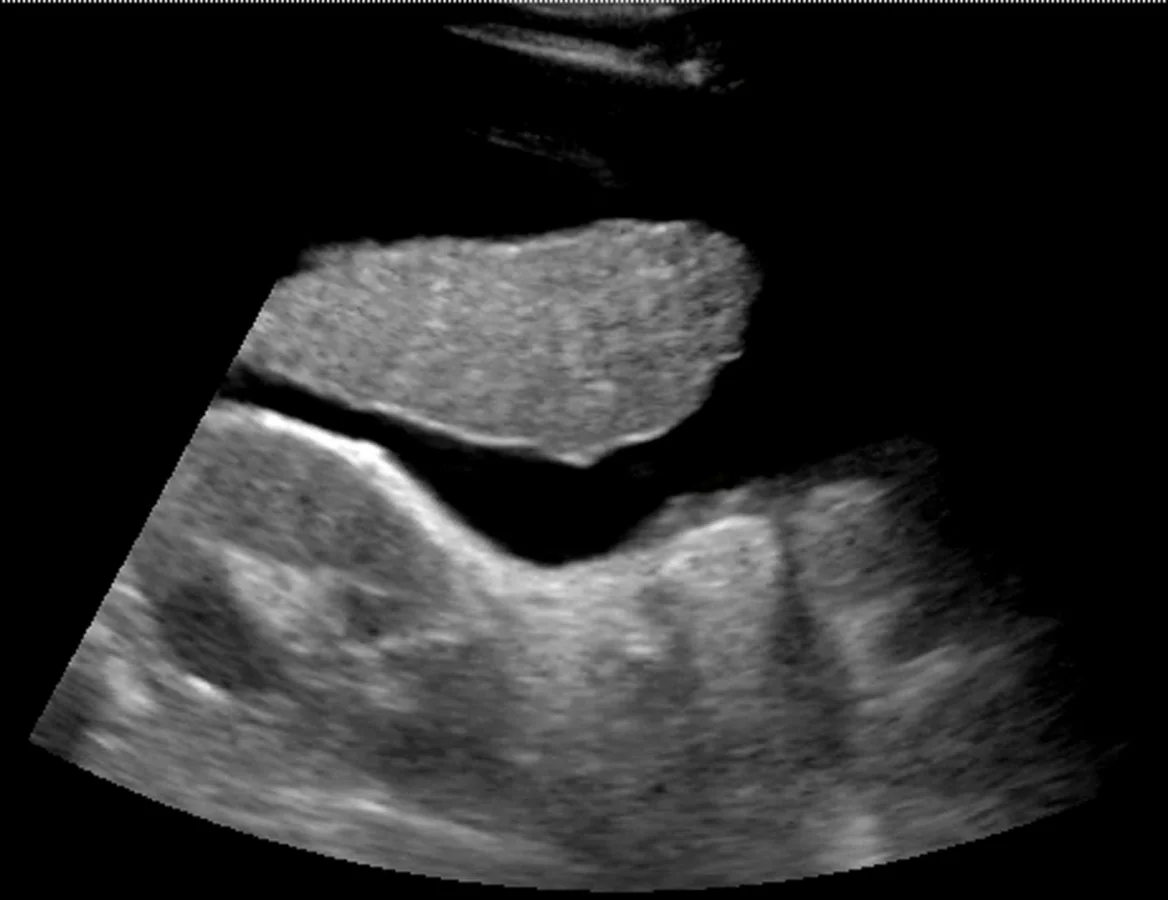
Tips for RUQ Morrison’s Pouch (Hepato-Renal Recess) View:
If rib shadows get in the way, using the same trick above of patient inspiration can help. There are also a few false positive “traps” here.
First, the double line sign, seen around the kidney capsule as hyper-echoic double lines with hypo-echoic material in between, can be mistaken for free fluid. SEE ABSTRACT. However, free fluid will not be surrounded by hyperechoic lines and will not be in a contained structure.

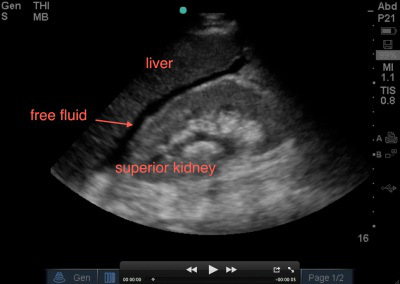
Second, edge artifact from the liver/kidney interface occurs due to ultrasound physics and sound wave transmission between structures of different densities. It is seen as a dark thin line tracing off the edge of this interface extending to the bottom of the screen. . This differentiates it from free fluid, which will not extend past the liver.
Tips for RUQ Paracolic Gutter View:
This is where free fluid can be seen first amongst all the different zones of the RUQ view. The most important tip is to not forget to view this area.
You will often have to slide your probe more inferior to obtain this view. Decrease the depth to look around the hepatic edge and inferior kidney pole, and evaluate the region with slow fanning.
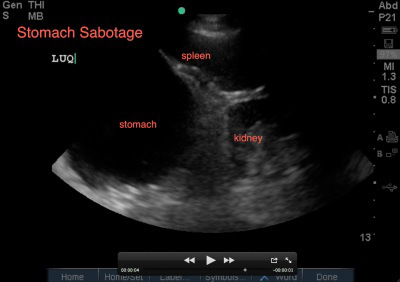
The Left Upper Quadrant (LUQ)
The LUQ is less sensitive for free fluid than the RUQ for varying reasons.
First, the LUQ is opposite the side of the sonographer, which can make it technically more difficult to obtain an adequate view. Also, the spleen is smaller than the liver and, thus, the acoustic window is lessened.
Leaning across your patient, your hand is often resting entirely on the bed.The stomach commonly obstructs the view as well.
The LUQ should also be divided into 3 zones:
1. Above/Below the diaphragm,
2. Spleno-Renal recess,
3. Paracolic gutter: Around the inferior pole of kidney
Tips for the LUQ view
In addition to the various RUQ view tips and tricks as stated above, the LUQ diaphragm view also requires tips to avoid “stomach sabotage”. There are two ways around this: oblique the probe to have the indicator angled toward the gurney and/or slide your probe to the posterior-axillary line away from the plane of the stomach.
The Cardiac Views
The traditional cardiac view obtained as part of the FAST exam is the sub-xiphoid view. The main focus of this view in the FAST exam is to evaluate for evidence of cardiac injury by evaluating for pericardial effusion and/or cardiac tamponade. The probe is placed in the sub-xiphoid space medially, applying pressure to go under the xiphoid process and flattening out the probe while aiming caudally ('scooping out the heart')
Tips for the Subxiphoid View:
1. Use your liver as an acoustic window.
Sound waves will travel through liver to the heart, allowing you to visualize the heart. Often one can even place the probe slightly to the right of the xiphoid process, to allow for better liver visualization, and then adjust your depth to be able to look past the liver to the heart. Without the liver in view, gas scatter will affect your image acquisition.
2. Visualize both the inferior and superior pericardial borders, to completely evaluate for pericardial effusion or, rarely, loculated pericardial effusions. It is possible for one area to have pericardial effusion and not the other.
3. Have the patient take a deep breath and hold it. When you notice that the heart is far from the probe, and you find yourself adjusting your depth to more than 20cm, having your patient take a deep breath will lower the heart closer to the probe, improving visualisation.
Lung Ultrasound
"Is there a pneumothorax?"
PTX (5MIN SONO)
When using ultrasound to evaluate for a pneumothorax, the probe is usually placed on the anterior chest in the 2nd-4th intercostal space & midclaviular line.
This is a starting point and a likely place to find a pneumothorax when the patient is in the supine position. Move up 1-2 rib spaces...medially...and laterally.
A high frequency linear probe is ideal for this exam.
Decrease the depth setting, so that the ultrasound image shows a maximum depth of about 4 cm. The probe is placed in a longitudinal position with the marker-dot pointed cephalad/towards the head
In this orientation rib shadows can be used to find the pleural plane. It is best to adjust the probe linearly until two ribs are apparent, one on each side of the image.
Between the ribs the pleural interface will be apparent at the posterior border of the ribs. It is important to anchor the probe and hold it very still while looking for the sliding motion of the visceral pleura against the parietal pleura.
" Walking Ants " & "Comet tails" (reverberation artefact) may also be present, confirming normal lung.
Change the mode to M-mode.
Normal sliding pleura and lung interface should look like 'wave crashing romantically on a pacific island beach' "SEA-SHORE SIGN"
A PTX will lack normal lung sliding / Ants / Comet tails & have the "Stratosphere sign" on M Mode
The Suprapubic Views
The suprapubic view on the eFAST exam is generally the last of the four views performed.
Both Longitudinal & Transverse views are required
Theoretically, given its dependent anatomical position, one may conclude that it should in fact be the most sensitive view to visualize free fluid; unfortunately, the literature has negated this theory – and in fact this can often be the least sensitive view, largely in part of human error, and especially in pelvic fractures.
Anatomically, when we scan the suprapubic area in both transverse and longitudinal planes, there’s a lot that we see –the bladder, bowel, pelvic bones, pelvic organs, and rectum to name a few.
This might make it harder for us to visualize free fluid, and separate it out from these other structures. But here’s a few tips to help overcome these limitations. Begin by placing your curvilinear probe just above the pubic symphysis, aiming inferiorly/caudad into the pelvis.

Tips for the Suprapubic View:
1. Look through a full bladder. - The suprapubic view is best visualised using a filled bladder as the acoustic window. Not all trauma patients come in with a full bladder....
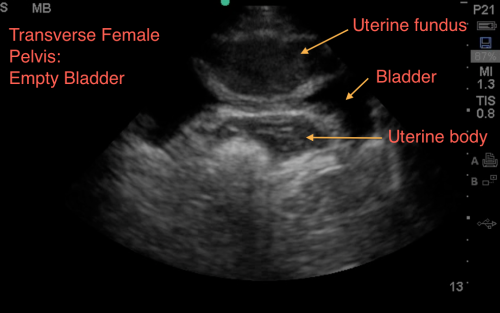
It is important to note, that if your patient has an empty bladder, it makes it tough, you may have to repeat scan after hydration, when the bladder is more full. With an empty bladder your ability to adequately discern free fluid is very limited. Mostly due to gas scatter from bowel, inadequate depth adjustments, and inability to discern bowel fluid from free fluid.
Click Here for a Video of A Normal Female (Pelvis)
2. Adjust your depth - More often than not, when it is time to scan the suprapubic area, your depth is set too deep from scanning the upper quadrants or cardiac views. We often find that a depth of about 13cm to 16cm optimizes your view. The goal is to have your bladder centered on the screen, to easily visualize the areas surrounding the bladder
3. Adjust your gain – The bladder is a fluid filled structure, and as mentioned before, fluid is the “lover” of ultrasound, allowing structures deep to it to be well visualized, however this often creates an artifact called “posterior acoustic enhancement” that produces a hyperechoic and bright area deep to the bladder. This makes it hard to visualize anechoic or black free fluid.
One of the biggest pitfalls is not decreasing your gain to accommodate for this, and limiting your ability to pick up anechoic free fluid.
A good rule of thumb, is to ensure that you can easily visualize pelvic organs. If you are able to identify a uterus or a prostate easily, that usually means you have adjusted your gain appropriately.
Click Here for a Video of Posterior Acoustic Enhancement
4. Look everywhere - Unlike in your upper quadrants, free fluid in the pelvic cavity can in fact collect anywhere – anterior, lateral, and posterior to the bladder as well as anterior, lateral, and posterior to the uterus in female patients. This often is dictated by your patient’s position, the lay of the uterus, how full the bladder is, and the size of the prostate to name a few. We suggest looking in four areas –
a. Look anterior and cephalad to the bladder.
Click Here for Video of Free Fluid Anterior to the Bladder.
This is especially true if the bladder is empty. At times, free fluid will be mistaken for the bladder and thought to be a septated bladder, when in fact it is free fluid cephalad to the bladder.
Click Here for Video of Free Fluid Easily Mistaken for Bladder.
b. Look adjacent/lateral to your bladder; free fluid will collect into a “wedge” shape or triangular shape in between bowel folds which will be most evident with appropriate fanning through the region.
Click Here for Video of Wedge of Free Fluid.
c. Look deep/posterior to the bladder between it and your pelvic organs.
Click Here for Free Fluid Posterior to the Bladder.
Especially in females, you can see a collection of free fluid between the bladder and the uterus. This often looks like boxed shaped anechoic structures that as you fan through will appreciate it not being a “contained” structure.
d. Look posterior to your pelvic organs. Free fluid can collect deep to your uterus or prostate.
Click Here for Video of Free Fluid Posterior to the Uterus.
5. Seminal vesicles are also anechoic/black – In males, don’t be fooled by the seminal vesicles. These lie immediately posterior to the bladder, and often appear like a anechoic “bow-tie” shape, with contained fluid and equal on each side.
They will always appear in the same location, and you should fan slowly and carefully through the region to ensure that this is a contained structure and not mistake it for free fluid.

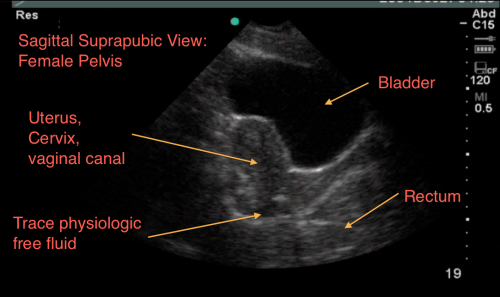
6. Physiological free fluid in females - In menstruating females you can appreciate some physiological free fluid that may be normal.
This is hard to differentiate truly from traumatic free fluid, and you will need to consider the clinical picture – Is there any abdominal pain? Is there abdominal or pelvic trauma? Are her vital signs abnormal?
Also, the amount and location of free fluid can help – physiological free fluid is found deep to the uterus, and along its border – it should not be greater than 1/3 the length of the border, anything greater than 1/3 should be considered pathological.
7. Fan slowly - While fanning is always important in evaluating any region by ultrasound – we cannot stress it enough when evaluating the suprapubic area.
It is impressive and often surprising just how much free fluid can “hide” behind and around the many structures present in this region, and not be visualized unless you delicately fan through the area.
You must view the suprapubic area in 2 planes – horizontally/transverse and longitudinally and fan through each section slowly to make sure you don’t miss any free fluid!
8. Quick Pregnancy Test- In female patients of reproductive age, while performing the pelvic view, take a quick look inside the uterus. You just may quickly get your answer to whether she is pregnant or not but visualizing a gestational sac with fetal pole or yolks sac or even a baby 'waving at you'.
However, if you only see a gestational sac and you are performing a FAST scan for unexplained hypotension or shock, this could be an identifier for a pseudo-sac of an ectopic pregnancy.
Here's eFAST summarised by SONOGUIDE.COM
So that's eFAST.
Now its hands on time....
Here's some more advanced tricks experts out there do with the USS also...
Sequentially Probed Areas Seeking Muntered Sites: 'SPASMS' exam
(Skip to 5:20 to avoid some of the chit chat...)
Does it work on kids?
Yes it does.
Credit and thanks to the teams at Sonospot and UltrasoundPodcast for much of the above material, images and videos.