EXTENDED FOCUSED ASSESSMENT with SONOGRAPHY for TRAUMA (e-FAST)
Source: Downeast Emergency Medicine
AIMS
Understand the indications of eFAST
Develop a systematic approach to an eFAST
Recognise the limitations of eFAST
Identify normal chest and abdominal anatomy
Recognise the presence of free fluid in the abdomen, thorax, and pericardial spaces
Recognise a pneumothorax
INTRODUCTION TO e-FAST
The e-FAST exam is a bedside ultrasound protocol used in the setting of the unwell trauma patient, to evaluate for haemoperitoneum, haemothorax, haemopericardium, and pneumothorax.
As with all ultrasound applications familiarity is required with:
Technique
Patient anatomy
Knowledge of common pitfalls
Appreciating technical limitations
INDICATIONS
As with any PoCUS scan in the unwell patient its use should not delay any definitive care or treatment. The eFAST should be integrated seamlessly into into your management of the patient as part of your resuscitation.
It should be considered as an 'extension' of the trauma clinical assessment process, to aid rapid decision making towards a critical intervention or emergent transfer to an operating theatre (see MMH ‘RED BLANKET’ protocol).
The eFAST protocol is used in the setting of trauma:
To help differentiate the cause of shock in the haemodyamically unstable trauma patient
In the setting of blunt or penetrating abdominal and thoracic trauma
In the setting of the decompensating trauma patient
A clinically stable patient who has now become unstable
Importantly a normal eFAST does not replace or exclude the need for a trauma CT scan in the correct clinical setting (see guideline for MRCT in trauma).
LIMITATIONS
As with any PoCUS recognition of limitations is critical part of a clinicians use of ultrasound in the ED. Extensive studies have shown the utility of the eFAST exam, but even with the best technique there are significant limitations.
Intra-abdominal free fluid- sensitivity around 85% (98% specificity) requiring at least 200ml blood for identification (CT < 100ml near 100% sensitive)
Sensitivity is near 100% in the setting of the hypotensive trauma patient
Thoracic free fluid - sensitivity for detection 92-100% requiring at least 25ml
Pericardial fluid - sensitivity and specificity near 100% for 20ml (acute tamponade requires 50-100ml to occur)
Pneumothorax- sensitivity 86-98% and specificity 97-100%
In particular the clinician should recognise:
Free fluid may not be obvious early in assessment (>200ml to be highly sensitive)
Serial eFAST for free fluid can help overcome this especially in the setting of new hypotension or deterioration
Fluid moves so location is dependent on patient positioning
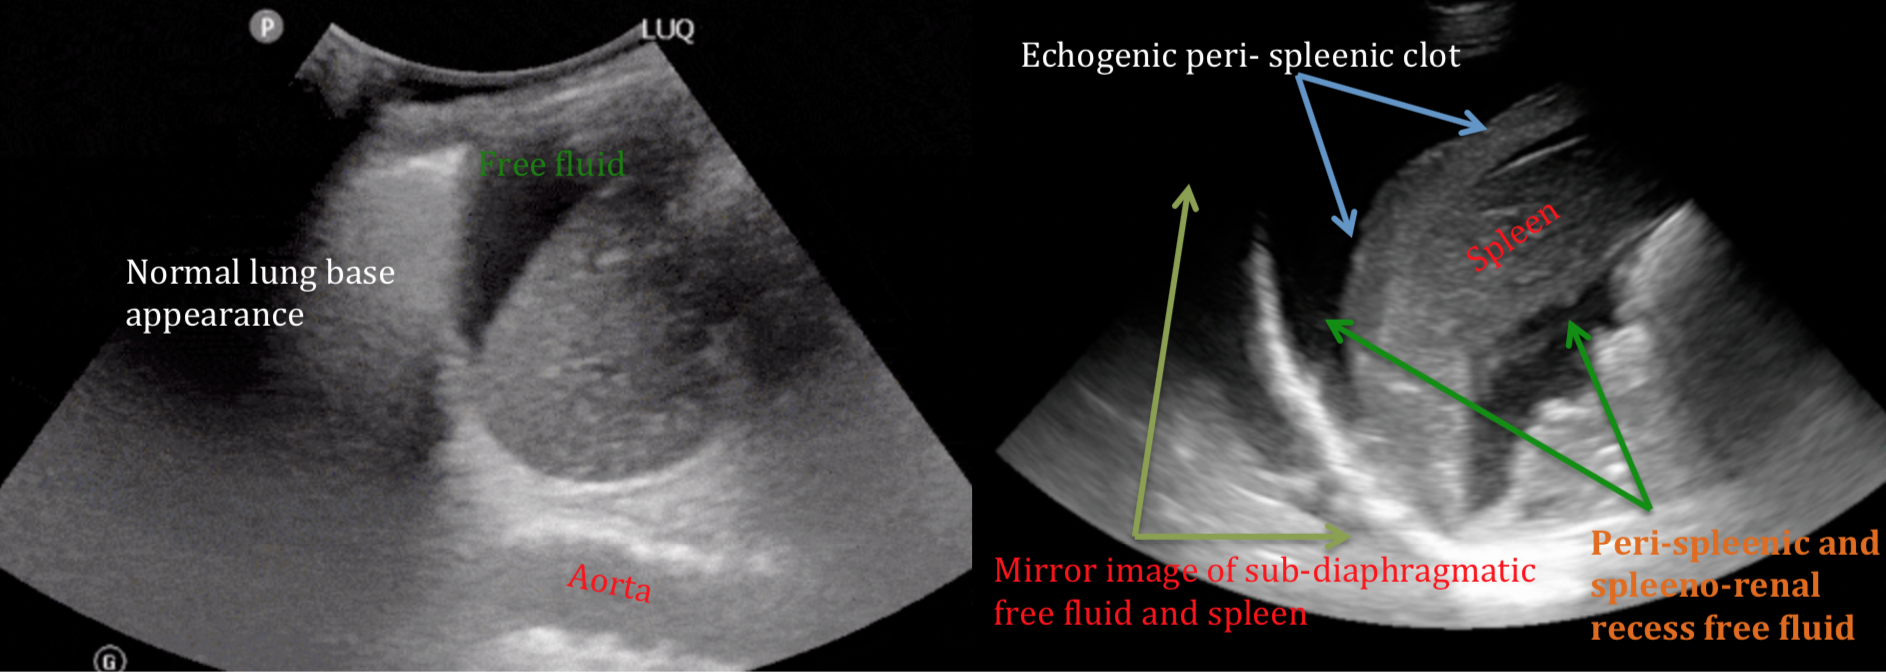
Clot formation may impair recognition of haemoperitoneum. Being seen as echogenic or mixed echogenicity rather than the anechoiec (black) nature of fresh blood.
Ultrasound cannot determine the nature of free fluid i.e ascites vs fresh blood
Clinical scenario should obviously aid interpretation
eFAST has poor sensitivity for organ injury or location of injury
a negative eFAST does not exclude important intra-abdominal injury
Retro-peritoneal injuries or bleeding are poorly seen
Within the extent of any subcutaneous emphysema ultrasound views will be severely limited
Pneumoperitoneum will impair abdominal ultrasound (there are pathognomonic ultrasound findings with pneumoperitoneum)
Obesity and pregnancy will limit sensitivity to a varying extent
PREPARATION AND E-FAST SEQUENCE
PATIENT
Supine
Trendelenburg (slight head down) can improve sensitivity in the upper quadrants for intra-abdominal free fluid
Adequate analgesia can facilitate examination
ULTRASOUND MACHINE
Probe and Preset:
Curvilinear probe is preferred using an abdominal preset
Can be used for complete eFAST exam, however is more difficult to interpret in the detection of pneumothorax
Phased/cardiac probe can be used but has poorer resolution at depth
Helpful for subcostal cardiac view and intercostal locations
Good penetration depth
Linear probe is best for detection of pneumothorax, lung or general preset
Probe choice is user dependent, and may change depending on views gained with certain probes, body habitus, patient instability, and serial examination.
A general recommendation would be to use the Curvilinear probe for the RUQ, subxiphoid, LUQ, and pelvic views; then change to the Linear probe for detection of a pneumothorax.
e-fast sequence
The sequence of the eFAST will be determined by your clinical concern and priority. Essentially you are asking 4 binary questions:
Is there intra-abdoninal free fluid?
Is there intra-thoracic free fluid ?
Is there a pericardial effusion ?
Is there a pneumothorax?
That exact sequence of your exam is not overly important, but it should be systematic, repeatable, and interrogate all important areas.
If your priority is the determination of a pneumothorax or pericardial effusion, such as in the setting of penetrating high abdominal or thoracic injury, you will naturally start with this part of the exam. Subsequently, the clinical scenario allowing, it is also important to complete the rest of the eFAST.
In the general trauma patient a systematic process for the eFAST is recommended:

CAPTURING IMAGES
You need to save images of each zone of interest within each eFAST view, a combination of video and static images is useful:
Short videos of each zone are helpful to show fanning through the area
These can also be reviewed more carefully at the bedside once your initial eFAST is complete
Dynamic video images of pleural sliding and cardiac activity are helpful for review and interpretation
Also static images can be saved as representations of each zone within the eFAST location being imaged
Be sure to label all images with appropriate location.
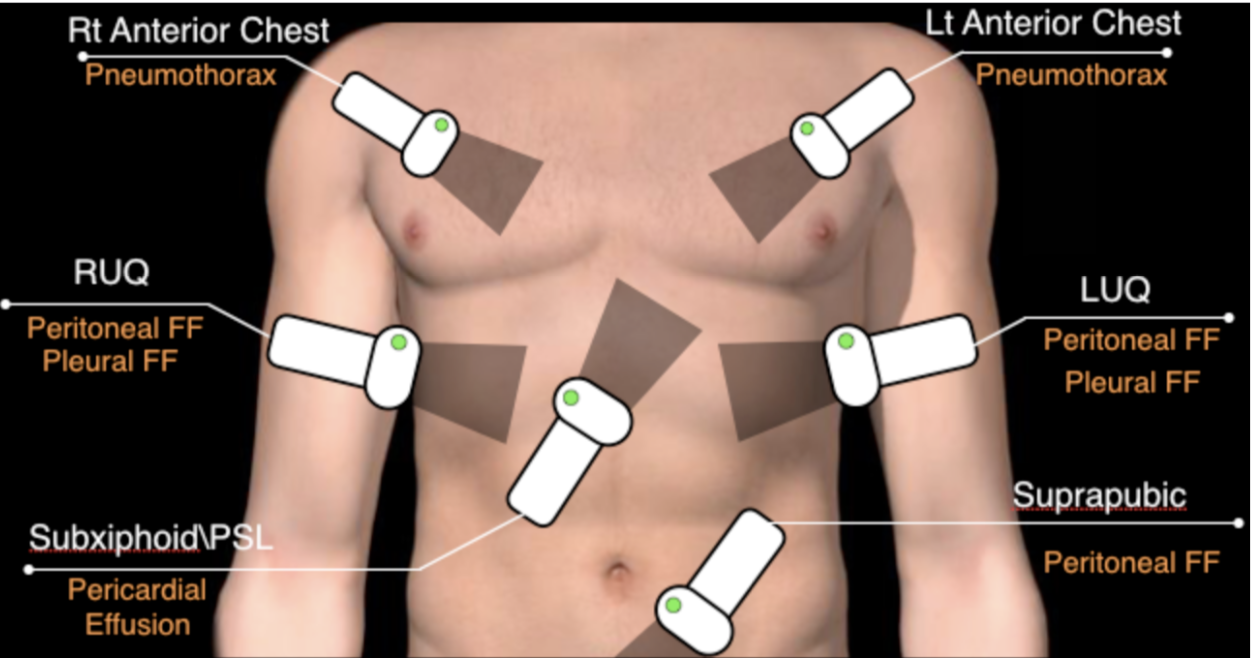
E-FAST PROTOCOL
INTRODUCTION TO E-FAST (Dr JASON T NOMURA)
Soundbytes- RUQ normal
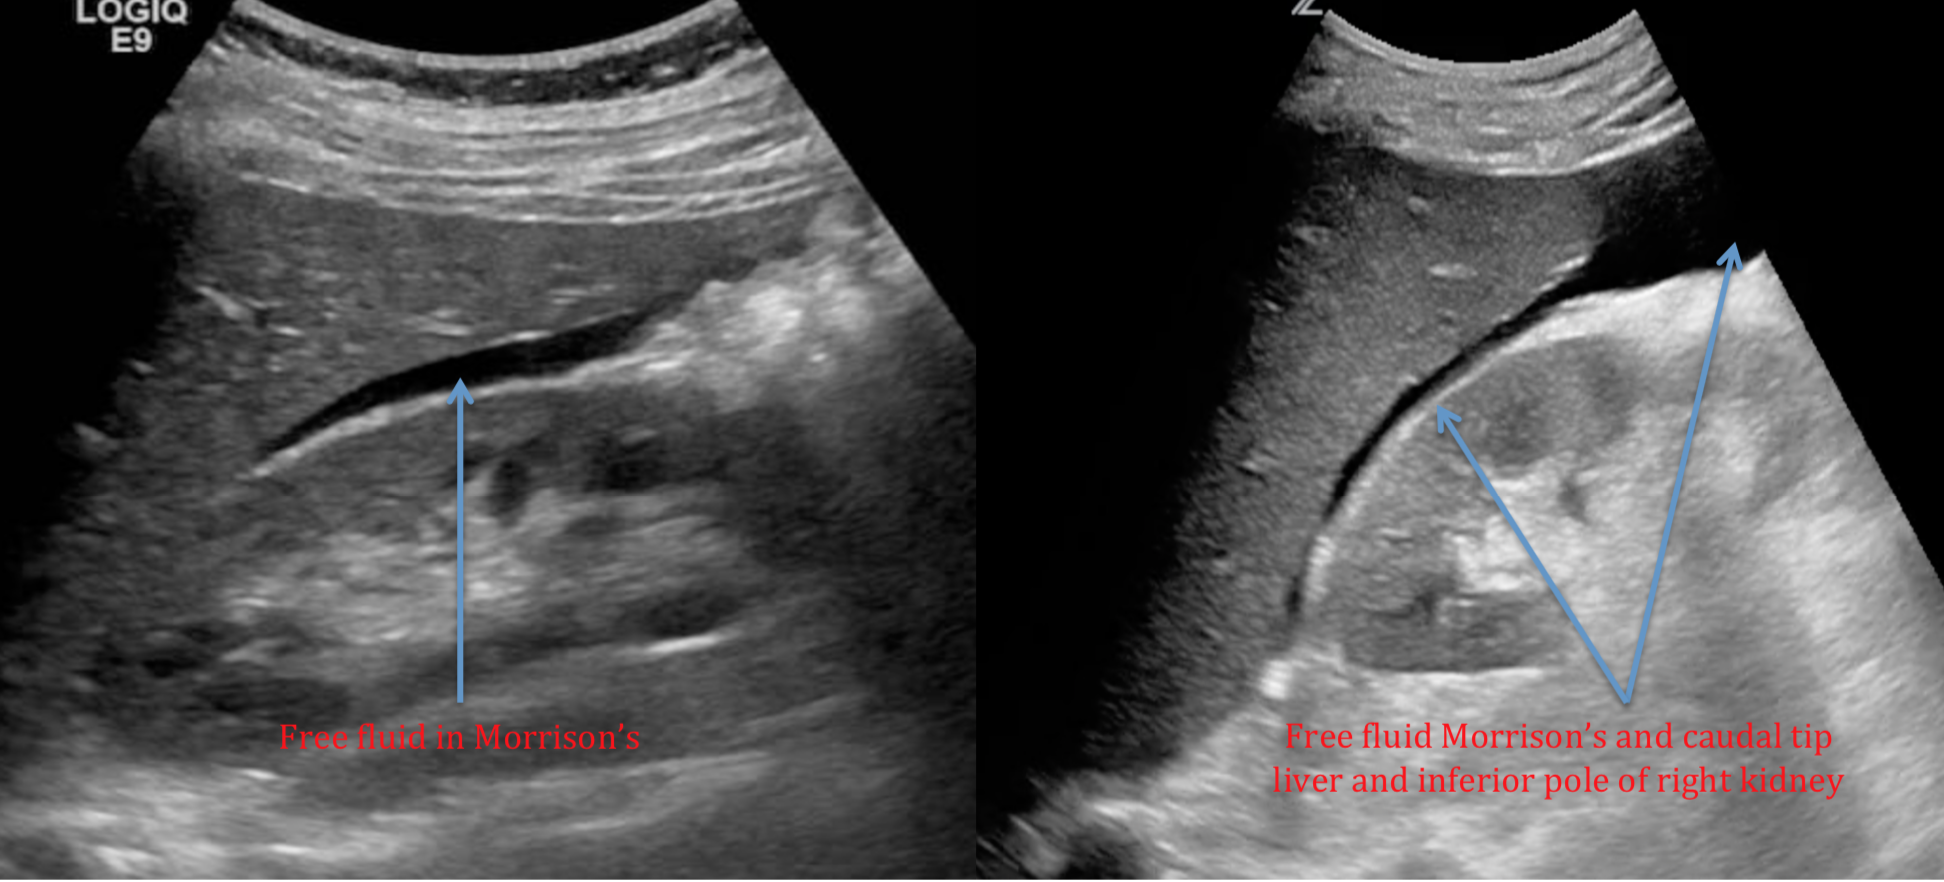
Soundbytes- RUQ haemorrhage
The RUQ is the most sensitive and likely place to see free intra-abdominal fluid, in particular at the caudal tip (inferior tip) of the liver (sensitivity 93%). Interrogation of all zones of the RUQ is important to look for pleural fluid and intra-abdominal free fluid.
There are 4 main zones of interest:
Supra-diaphragmatic for thoracic fluid (above diaphragm)
Infra-diaphragmatic (below diaphragm) or subphrenic space
Morrison’s (hepato-renal space)
Caudal liver tip-inferior pole of the kidney into para-colic gutter
When scanning use this thought process concept:

Initial Probe position:
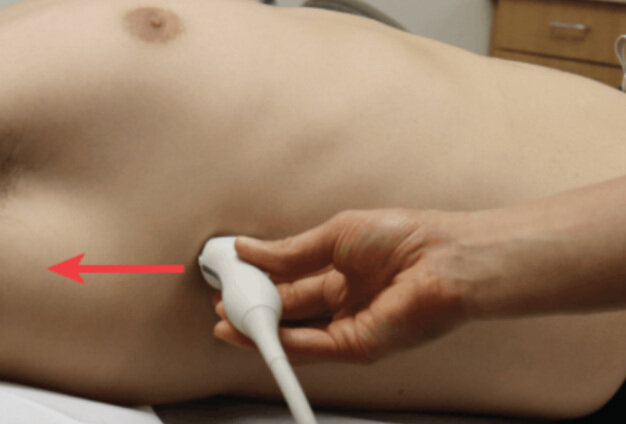
Source: POCUS 101
Coronal longitudinal plane (probe marker to the head)
Rotate the probe slightly oblique to get within the intercostal space
Position at the right mid-axillary line at the level of the xiphoid process in the intercostal space
Angle and/or slide your probe posterior or anterior to get a view of Morrison’s

Ensure your depth is adequate so that the spine can be seen deep to the kidney
Fan slowly anterior to posterior through Morrison’s recess to look for free fluid
Sources: LTFL and CanadiEM

Source: Sonospot
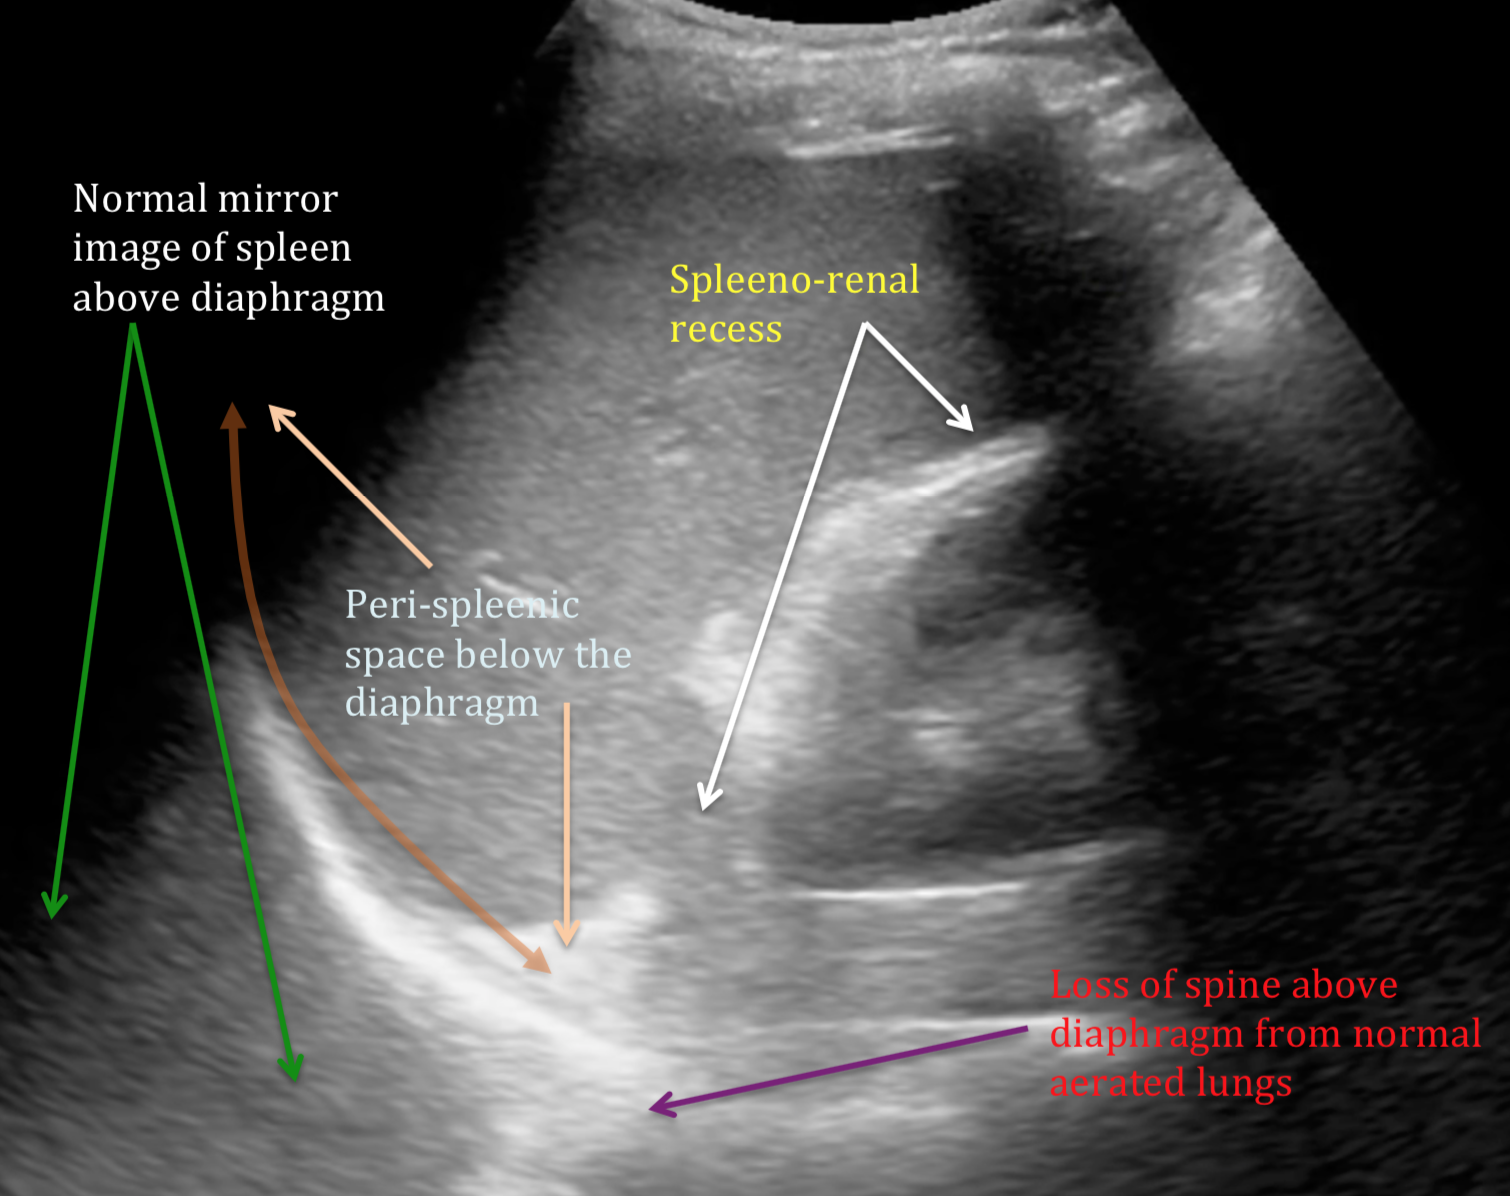
Slide up and ensure position within intercostal space to visualise the diaphragm and inferior pleural space (supra-diaphragmatic)
Once again repeat slow fanning though these zones to look for free fluid above and below the diaphragm
Normal images will show mirror imaging of the liver above the diaphragm and loss of the spine deep to the lung.
If there is significant pleural fluid the ‘SPINE SIGN’ will be present
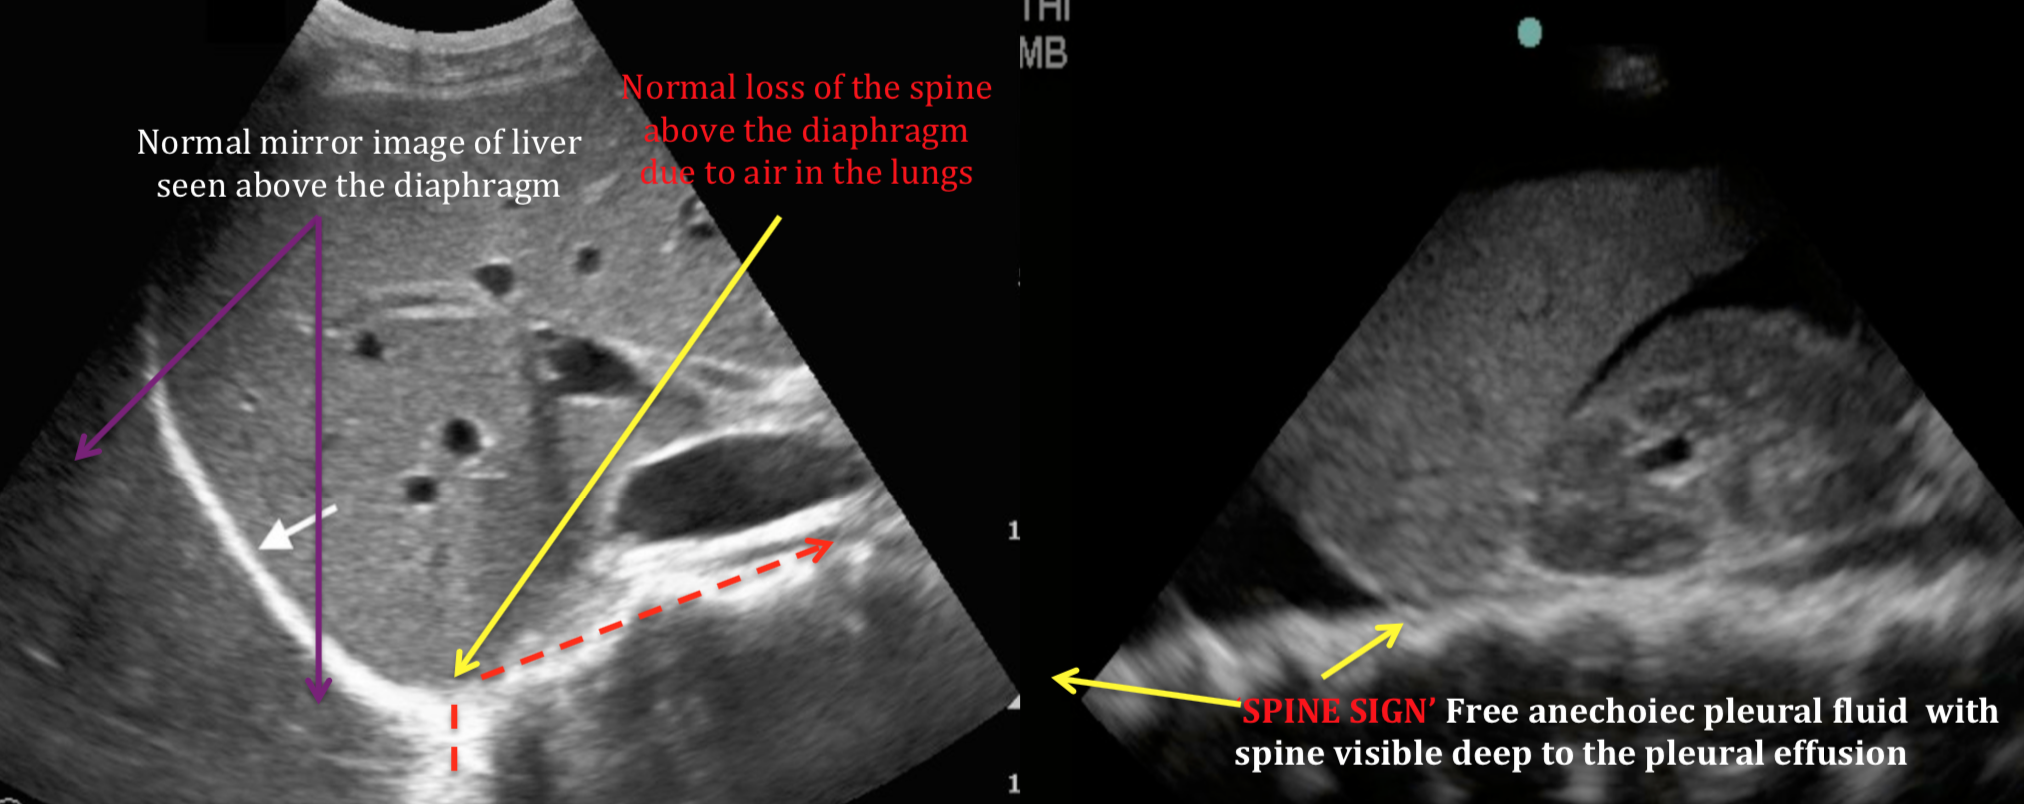
Sources: Sonospot and Research Gate (Modified)
Slide the probe caudaly to visualise the tip of the liver, kidney/inferior pole and paracolic gutter
fan slowly through this zone looking for free fluid
![Sources: Ultrasound Gel and Joesph Minardi [YouTube] (Modified](https://images.squarespace-cdn.com/content/v1/54b32dede4b0d2480d420a7a/1618193020855-QPE9B1RF0HI8Y3TWC5R7/paracolic+gutter+fluid.png)
Sources: Ultrasound Gel and Joesph Minardi [YouTube] (Modified
EDGE ARTIFACT AND DOUBLE LINE SIGN
False impression for free fluid in the RUQ (and other locations) can occur due to ultrasound artifacts and also normal anatomy:
Double line sign
Relatively hypoechoiec perinephric fat surrounded by bright hyperechoiec lines of the kidney border and edge of the perinephric fat
Free fluid would not be surrounded by these double hyperechoiec lines
Edge artifact
This is a common artifact caused be refraction and resulting de-focussing of the ultrasound beam at the edge or a curved structure
Seen as a symmetrical hypoechoiec (darker) zone projecting from the edge of a curved surface into the depth of the screen
Edge artifact projects to the bottom of the screen image beyond anatomical boundaries of potential free fluid

Source: Sonospot (Modified)
LUQ
Soundbytes LUQ
The LUQ is a less sensitive location for detection of free fluid in the abdomen. In particular this is due to the smaller acoustic window of the spleen (relative to the liver), and the potential for impaired view due to the stomach (air and fluid).
The most likely place to see free fluid is in the deep portions of the peri-spleenic space
There are 4 main zones of interest:
Supra- diaphragmatic for thoracic fluid (Above the diaphragm)
Sub- diaphragmatic (Below the diaphragm) or Peri-spleenic space
Spleeno-renal recess (Between spleen and left kidney)
Caudal tip of the spleen/inferior pole of the left kidney into the paracolic gutter
Initial probe position:

Source: POCUS 101
Position the probe in the coronal longitudinal plane (probe marker toward the patient’s head)
Level with the xiphoid in the posterior axillary line
Have your hand flush with the bed and tilt the probe slightly anterior
Rotate the probe slightly oblique as required to get within the intercostal spaces
Positioning the probe here will utilise the spleenic window and should avoid the stomach
Ensure visualisation of diaphragm by fanning through the view, and moving up/down a rib space to see the full extent of the diaphragm
Fan through the spleeno-renal recess, caudal tip of the spleen, and the left kidney
Move caudally with the probe to see inferior pole left kidney and para colic gutter, fan through again
Sources: POCUS Atlas and UCSD (Modified)

Source: Ultrasoundidiots.com (Modified)
SUBXIPHOID CARDIAC VIEW
The primary aim of this view is to identify any pericardial effusion in trauma.
Secondarily information about gross cardiac function may be ascertained:
Cardiac activity
Hyperdynamic - seen in hypovolaemia/haemorrhage
Hypodynamic - seen in severe shock state/peri-arrest and impaired cardiac function
RV and LV size
Probe position and depth:
Depth should be at least 15cm
The probe is placed in the transverse plane in the subxiphoid position slightly to the patients right using the liver as an acoustic window.
With the curvilinear or phased probe, in abdominal preset, the probe marker is on the patients right
Press the probe in while also tilting the probe superficially (hand and tail of probe is brought onto the patient’s abdomen) aiming towards the patient’s left shoulder.

Source: Somepomed.org

Sources: BMJ and CoreEM
Ensure adequate depth so that any pericardial effusion deep to left side of the heart will be visible in your image

Source: Sonosite
If clot forms it will look echogenic in nature, usually within some associated anechoiec (black) fresh blood

Source: Core Ultrasound (Modified)
Tips for the Sub-xiphoid View:
Use the liver as an acoustic window
Flexing the patients knees up may relax the abdomen and help with this view, but is often not feasible in a trauma scenario
Similarly deep inspiration with a breath hold can bring the liver down and improve the acoustic window.
Visualise both the superficial and deep pericardium for localised effusions
Sub-xiphoid View Pitfalls:
Remember traumatic haemopericardium are typically very small, with as little as 50-100ml causing tamponade
You must ensure views of superficial and deep pericardial surfaces
Clotted blood will be echogenic rather then anechoiec
Pericardial fat pad can be mistaken for a small pericardial effusion
Will be only seen on anterior pericardium (superficial)
More echogenic (brighter) then anechoiec effusion
As you fan posteriorly through it will disappear

Source: emottawablog.com (Modified)
SUPRAPUBIC views
Soundbytes cases - e-FAST Suprapubic
The suprapubic view on the eFAST exam is generally the last of the four views performed.
Least sensitive location for the detection of free fluid despite the dependent location.
This is largely due to it being more challenging to detect free fluid
complex anatomic structures that are different in males and females
Ensure you optimise your images:
In particular adjust gain and TGC to account for posterior acoustic enhancement from the bladder which can potentially hide free fluid in the deep recesses of the pelvis
Both Longitudinal & Transverse views are required with particular zones of interest being:
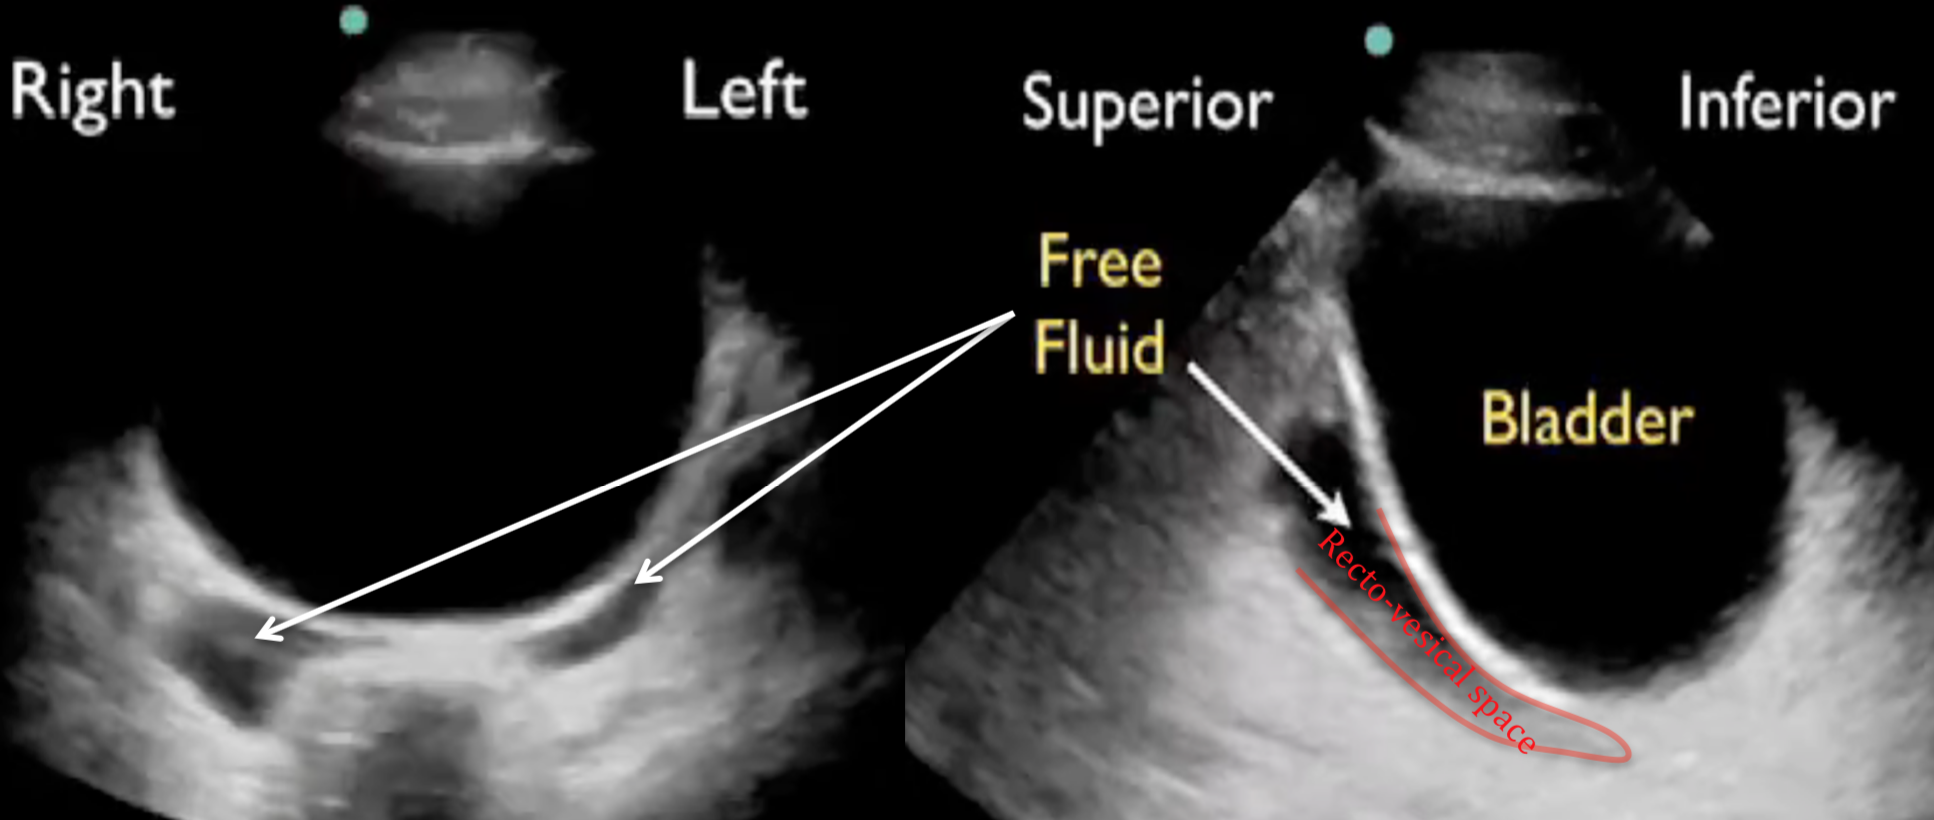
Lateral to the bladder best seen in the transverse plane (Both sexes)
In females deep to the uterus in the recto-uterine space (Pouch of Douglas)
In males in the rectovesical space
Initial probe position:
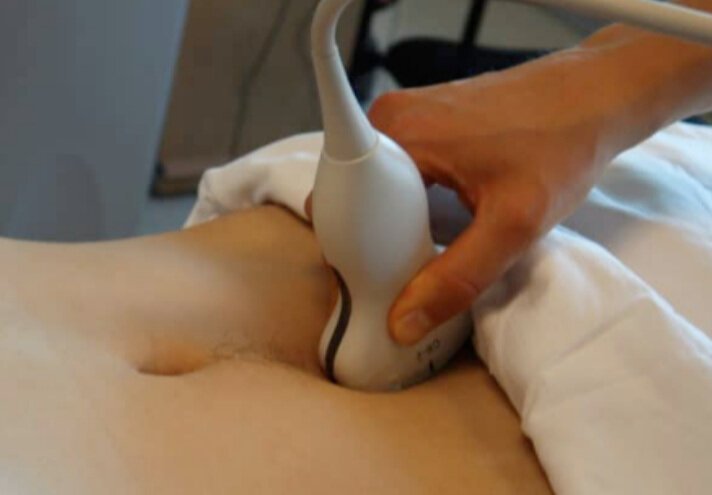
Place the curvilinear probe in the midline in longitudinal plane (probe marker to the head) just above the pubic symphysis
Angle the probe in a caudal direction (towards the patient’s feet) to utilise the bladder as an acoustic window
If the bladder is empty it is situated inferior and behind the pubic symphysis (extra peritoneal structure)
Source: POCUS 101
Visualise the the structures looking for free fluid and also fan side to side through the volume of the pelvis
Female pelvis:
In the longitudinal plane find the midline located by the identified vaginal stripe
Ensure adequate depth to see recto-uterine recess
Fan through volume side to side for free fluid
Initial free fluid is seen in the recto-uterine pouch, but can accumulate anterior to the uterus in the vesico-uterine space
Normal small amounts of free fluid in the recto-uterine space (Pouch of Douglas) can be seen in young females of reproductive age

Source: Westernsono (Modified)
Transverse plane
After fanning through the longitudinal plane, while at the midline, turn the probe 90 degrees anti-clockwise so that the probe marker is towards the patient’s right.
Identify the anatomy and fan through by tilting up and down (cephalad-caudal) to look for free fluid within the pelvic volume

Source: Westernsono (Modified)

Source: Emory EMUS (Modified)
Male pelvis:
E-FAST MALE PELVIS (Vanderbilt)
In the longitudinal plane place the probe in the midline as above
Ensure adequate depth to see the recto-vesical recess
Identify anatomy of the bladder, seminal vesicles, and prostate
Fan through volume of the pelvis in the long plane
Rotate 90 degrees anti-clockwise to transverse plane (probe marker to patient’s right)
Identify anatomy
Fan through pelvic volume

Source: Samir Haffar (Lecture eFAST)
Source: Soundbyte Cases (Modified)
Tips for the Suprapubic View:
Ideally Look through a full bladder -not all trauma patients come in with a full bladder....
Adjust your depth - often need to reduce depth from prior imaging windows.
Adjust your gain- Bladder “posterior acoustic enhancement” makes anechoiec (black) free fluid hard to see deep to the bladder.
Fan slowly in two planes - While fanning is always important in evaluating any region by ultrasound it is particularly so in the suprapubic views of the eFAST.
Quick Pregnancy Test- In female patients of reproductive age take a quick look inside the uterus for a gestational sac with fetal pole/yolk sac, or even a baby.
PITFALLS FOR THE SUPRAPUBIC VIEW

Source: Samir Haffar (Lecture eFAST)
Seminal vesicles are also anechoiec/black – In males, don’t be fooled by the seminal vesicles. These lie immediately posterior to the bladder, and often appear like an anechoiec “bow-tie” shape equal on each side.
They will always appear in the same location, fanning slowly and carefully through the region will ensure that this is a contained structure and not free fluid
Physiological free fluid in females - In females of reproductive age you can appreciate some physiological free fluid that may be normal.
This is hard to differentiate truly from traumatic free fluid, and need to consider the clinical picture
The amount and location of free fluid can help as physiological free fluid is found deep to the uterus, and along its border. It should not be greater than 1/3 the length of the uterus border. Anything greater than 1/3 the length should be considered pathological.
Look everywhere - Unlike in your upper quadrants, free fluid in the pelvic cavity can in fact collect anywhere:
E-FAST LUNG VIEWS
The lung views in an eFAST scan are aimed at determining if there is a significant pneumothorax on the left or right side.
This is not a complete scan of the lungs
Included are right + left longitudinal views
M-mode of each side is also recommended to help confirm a characteristic normal or abnormal pattern
Subcutaneous emphysema under the probe will impair any imaging
probe choice
The probe of choice is the high frequency linear probe
The curvilinear probe can also be used effectively.
The phased/cardiac probe has a very narrow field of view at superficial depths, this is not ideal for visualising the pleura or pleural sliding.
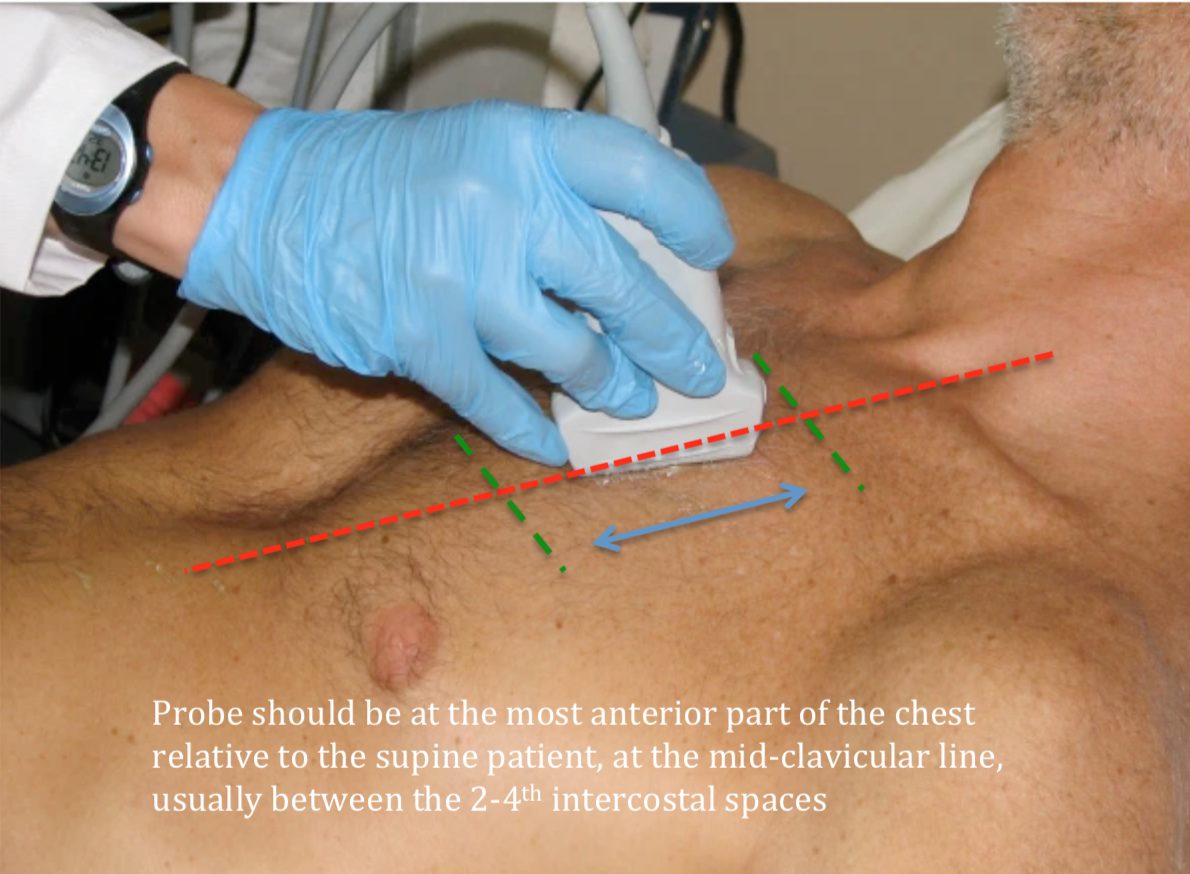
Probe position
In the supine trauma patient the probe should be placed at the most anterior part of the chest in the mid-clavicular line, with the probe in a longitudinal plane (marker towards the head).
Air in a pneumothorax should locate to this most anterior position of the thoracic cavity
Reduce depth to 4-5cm
Sourec: Sonospot (Modified)
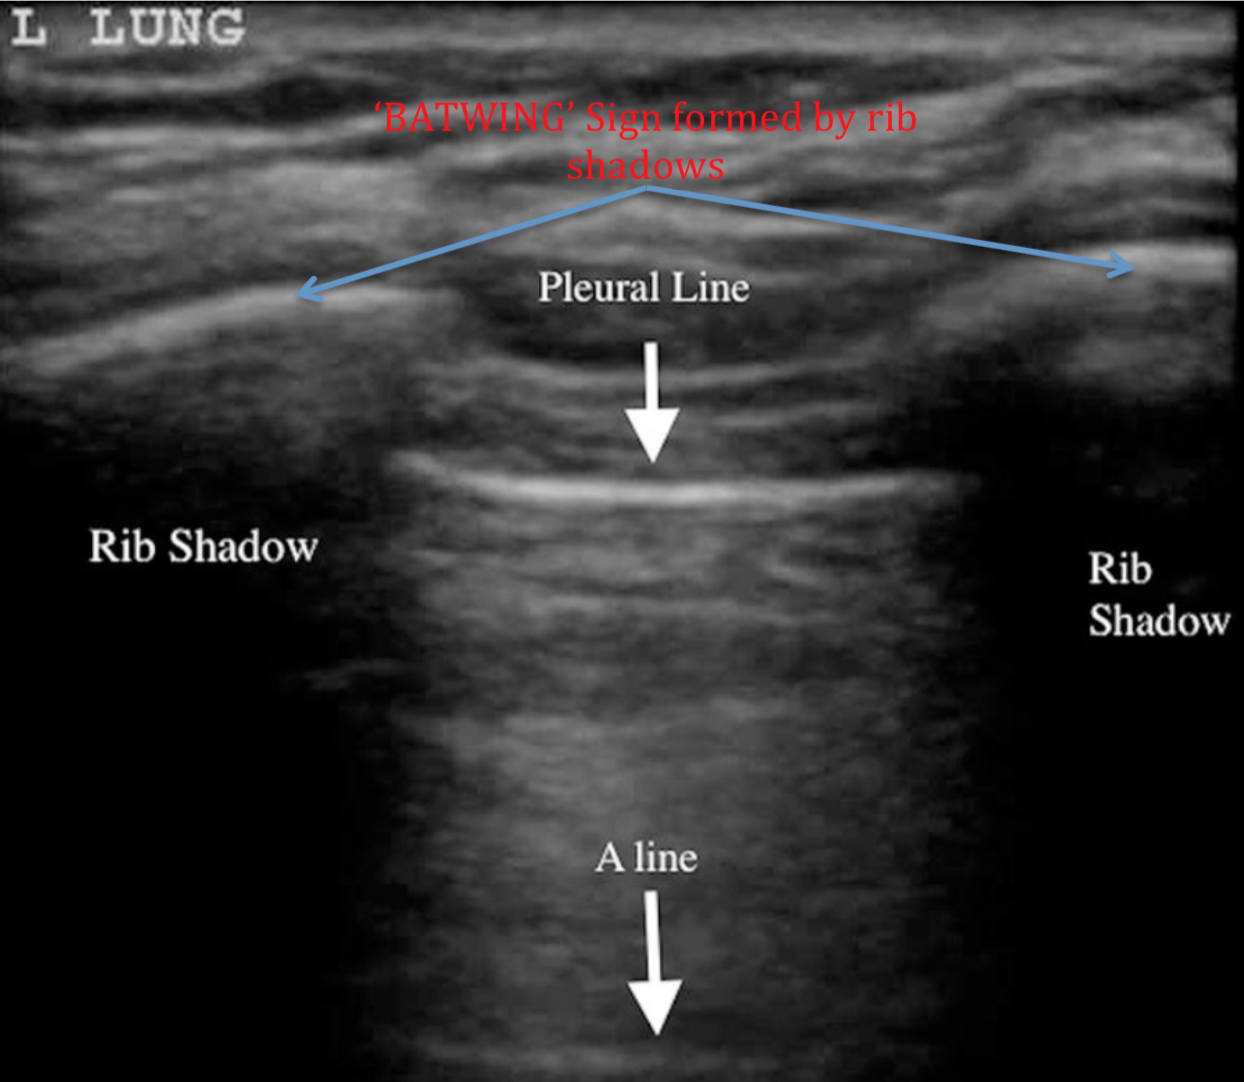
Normal ‘BATWING’ sign can be seen from rib shadowing with intercostal space between
pleura is identified
Source: BMJ (Modified)
NORMAL PLEURAL SLIDING
B-mode (2D)
We are looking for pleural sliding (movement between parietal and visceral pleura)
You may also see small ‘comet-tail’ reverberation artifacts projecting a short way from the pleura (seen in video below) - these are lost in a pneumothorax
Presence of pleural sliding indicates that there is no pneumothorax at this specific intercostal location of the probe (NPV 99%)
This does not completely exclude a small pneumothorax in a different probe position in a more anterior, or apical location
M-mode
Using M-mode we can help confirm normal pleural sliding seen in B mode at this location with the finding of a normal ‘ SEASHORE SIGN’

Source: Research Gate (Modified)
ABSENCE OF PLEURAL SLIDING
PNEUMOTHORAX (Dr James Rippey)
Absence of pleural sliding in the right clinical setting is suggestive of a pneumothorax
It does not rule in a pneumothorax
Presence of a pneumothorax can only be confirmed with high specificity by the finding of a lung point with near 100% PPV [see video below]
Apparent loss of pleural sliding can occur in a number of other settings:
Apnoea/respiratory arrest
Poorly ventilated patients
Severe hyperinflation - asthma/COPD
Adhesions/consolidation
Pleurodesis
Blebs or bullae
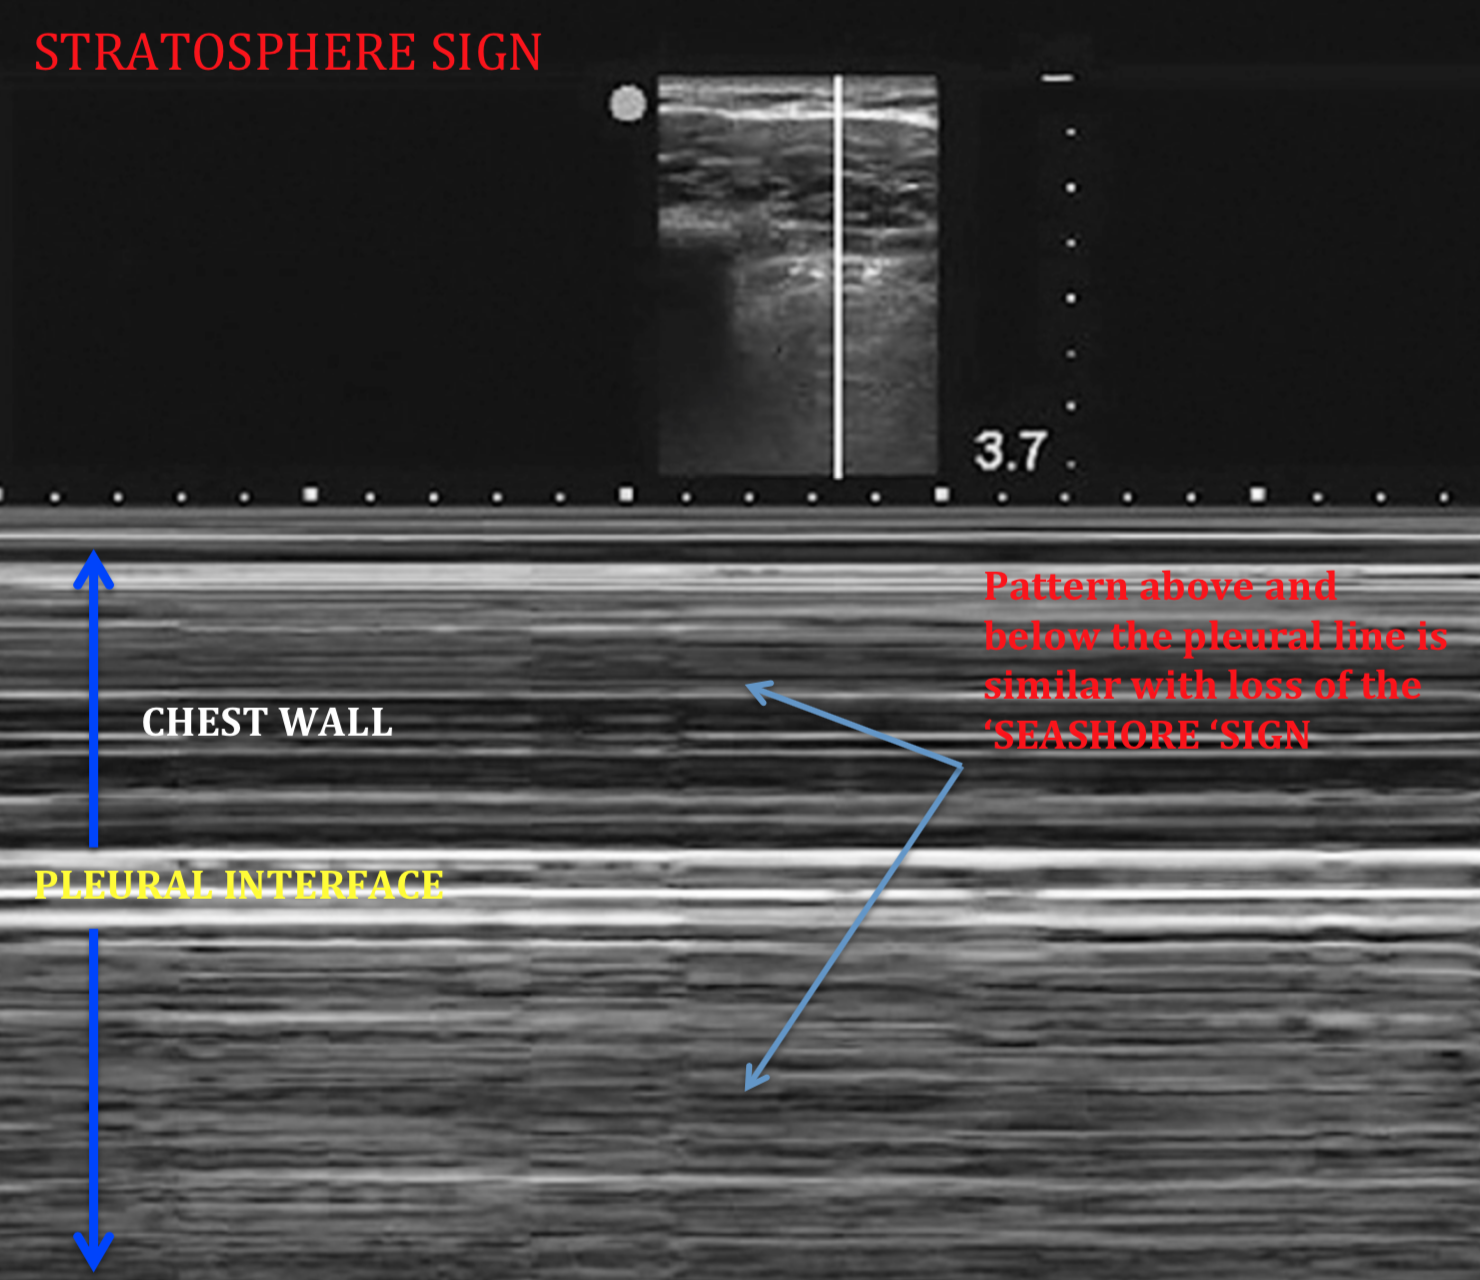
M-mode of a pneumothorax gives the characteristic ‘STRATOSPHERE’ or ‘BARCODE’ sign
This is a essentially a mirror image of the chest wall seen below the pleural interface on M-mode
Source: saudija.org (Modified)
LUNG POINT
Finding of a lung point rules in a pneumothorax with a PPV of near 100%
Typically we do not go hunting for a lung point in the eFAST exam, but it may be encountered during imaging
In more thorough imaging of a pneumothorax we can look for the location of the lung point to confirm the diagnosis, and help quantify the size.
It is important not to mistakenly interpret a lung point from a pseudo-lung point (video below)
A pseudo-lung point is a junction between the lung and mediastinum or diaphragm
Often seen on the left side of the chest where lung meets pericardium
PSEUDO-LUNG POINT VS LUNG POINT (Dr James Rippey)
B-lines and lung pulse
The presence of B-lines or a lung pulse seen beneath the probe essentially excludes a pneumothorax at this probe location.
B-Lines are a hyperechoiec (bright) reverberation artifact starting from the pleura projecting like flashlights to the depths of the screen.
> 3 per field of view is abnormal
Seen due to increased interstital fluid or lung fibrosis

A lung pulse may be seen in conditions where there is apparent loss of normal pleural sliding but without a pneumothorax
A lung pulsation seen at the pleura is the transmitted pulsation/movement from the heart
Usually seen when there is absent/poor ventilation, apnea, or severe hyper inflation
e-fast lung view tips
Use the linear probe with both B-mode and M-mode interrogation
Ensure you place the probe at the most anterior point of the chest
Remember your findings are only specific to the probe location
Reduce your depth to 4-5cm
Use B-mode to identify pleural sliding
Confirm with M-mode ‘SEASHORE SIGN’
The presence of pleural sliding, B lines, or a lung pulse excludes a pneumothorax at that probe location
Absence of pleural sliding does not rule in a pneumothorax
However in the right context it is highly suggestive
Use M-mode to confirm the characteristic ‘STRATOSPHERE SIGN’ of a pneumothorax
Finding a lung point has a near 100% PPV for pneumothorax