ECHO AND FOCUSED ECHO IN LIFE SUPPORT

Focused echo in life support (FELS) or basic focused cardiac ultrasound (FCU) utilises basic bedside echo views looking for important qualitative cardiac findings. These findings can be integrated with other PoCUS findings, and the patient clinical picture, in order to aid diagnosis, guide investigation, and improve targeted management. In general the focus of the examination should be answering a few specific binary questions:
Is there a pericardial effusion and the size (+/- Tamponade)
Qualitative LV and RV size and function
Determining fluid status (at extremes)
As well as qualitative echo, with appropriate training, some simple quantitative measures can be undertaken to help guide your cardiac assessment, and help define particular patterns of pathology.
AIMS
Understand the anatomy
Attain standard echo views
PLAX- parasternal long axis
PSAX- parasternal short axis
A4CH (extension views - A5CH/A2CH )
SUBCOSTAL and IVC
SUPRASTERNAL
Identify normal qualitative echo findings
Identify cardiac activity during CPR and in cardiac arrest
Recognise and interpret potential abnormal findings and physiology
Qualitative assessment of structure and chamber sizes
Qualitative assessment of LV - size, function, contraction
Qualitative assessment of RV size and function
Identify a pericardial effusion and signs of tamponade
IVC assessment - size and variability
Recognise Limitations of your focused cardiac assessment
Appreciate some potential characteristic echo findings of different pathologies
Pericardial effusion and tamponade
Acute PE with RV strain
Impaired systolic LV cardiac function
Sepsis
Appreciate abnormal valve appearance (not function)
Help differentiate causes of shock
Understand simple quantitative measures and limitations
LV systolic function - MV EPSS (end point septal separation), FS (fractional shortening)
RV systolic function- TAPSE (tricuspid annular plane systolic excursion)
IVC size and variation
Integrate findings with clinical picture
indications
Introduction to Focused Cardiac Ultrasound (A/Prof Sam Orde - Nepean)
Basic focused cardiac ultrasound should focus on limited binary questions. The user should recognised their limitations in experience and the interpretation of images obtained. More detailed examination and interpretation of echo findings should be only carried out with appropriate supervision and credentialed training. Always discuss and show your images to a credentialed supervisor if there is clinical concern, or any abnormal or unexpected findings. Formal investigation/imaging should always be sought if there is any clinical concern.
Some general clinical indications:
Cardiac arrest - assessment for cardiac activity
Assess gross LV and RV size and function
Assess for pericardial fluid and tamponade
Help in the determination of volume assessment
As part of a shock examination/determination of shock
Help guide vasopressor and inotrope therapies
Signs of RV strain in PE
LIMITATIONS
This is not a formal or quantitative echo !
Cardiac windows, positioning, body habitus and clinical condition
cardiac ultrasound probe and ORIeNtATION
The phased array/cardiac probe should be used for your cardiac ultrasound as it has the ideal parameters for attaining the desired views.
phased array PROBE
Small foot print enabling positioning between intercostal spaces
Wide field of view at depth and narrow superficially allowing interrogation of deep cardiac structures via a small ultrasound window.
Medium to low frequency transducer for adequate penetration depth
PRESET AND ORIENTATION
A cardiac preset should be used, with the screen orientation marker being at the top right of the screen image.
BASIC CARDIAC VIEWS AND positioning
There are 5 basic cardiac views that should be obtained. Often one or more of these views may be difficult to obtain in different patients and scenarios.
Parasternal Long axis view (PLAX)
Parasternal Short axis view (PSAX)
Apical 4 Chamber view (A4CH)
Subcostal view (SUB)
Subcostal IVC view
The apical 4 chamber view can be extended to:
Apical 5 chamber view (by slightly tilting the probe cephalad/tail to the bed) revealing the aortic outflow tract and aortic valve
Apical 2 chamber view (by probe rotation anticlockwise approximately 90 degrees) providing a view of the LA and LV chamber with anterior and inferior walls
Apical 3 chamber view (by rotation slightly further anticlockwise from the apical 2 chamber view) extends to include aortic valve and LV outflow tract, and shows the anteroseptal and posterior LV walls.
A sixth cardiac view is the suprasternal window which reveals the ascending and arch of the aorta.
Patient positioning
Positioning will depend on the patients ability tolerate movement and their ability to be placed more supine.
For parasternal and apical views ideally a patient should be positioned rolled towards their left side (left lateral decubitus), right arm by the side, and left hand placed on their head. The patient does not need to be completely supine.

Source : POCUS 101(modified)
For subcostal view the patient is spine ideally with their knees flexed up.

Source: sah.org.au
BASIC CARDIAC VIEW ACQUISITION
parasternal long axis view (plax)
At a parasternal location position the probe in the 3-4th intercostal space with the probe marker aimed at the patient’s right shoulder. The intercostal space will vary depending on the individual.
Slide the probe within the intercostal space to attain a clean window
Tilting the probe within the space to attain the view and avoid rib shadowing
Align the probe marker with the patients right shoulder - rotate to gain an elongated view of the LV (usually the apex will be slightly obscured)

Source: Kwaktalk.org
The PLAX view should be obtained with enough depth to visualise the structures deep to the descending thoracic aorta. This ensures visualisation of the potential posterior pericardial and pleural spaces to help exclude effusions.

RV - right ventricle outflow tract
LV- left ventricle
Ao- aorta and valve
LA - left atrium
Mitral valve:
AML - anterior mitral valve leaflet
PML - posterior mitral valve leaflet
Once an adequate view has been attained the depth can be adjusted to focus on the cardiac structures.
parasternal short axis view (PSAX)
At the probe location used to obtain the PLAX view the probe is rotated anticlockwise approximately 90 degrees so the probe marker is orientated to the patients L shoulder.

Adapted from Source: POCUS 101
In the PSAX view there are four main levels of imaging to obtain as you fan/tilt from the Aortic valve down towards the LV apex tilting the tail of the probe towards the R shoulder.
Aortic valve level - Mercedes Benz sign of the aortic valve
Mitral valve level - Fish mouth of the mitral valve
Mid papillary muscle level
LV apex - often not fully visible
PSAX Aortic valve level

PSAX Aortic valve level
RV - right ventricle, TV- tricuspid valve, RVOT- RV outflow tract, RA- right atrium, AV- aortic valve, LA- left atrium
PSAX Mitral valve level

PSAX Mitral valve level
RV- right ventricle, LV- left ventricle, MV mitral valve
PSAX Mid papillary level
PSAX Apical level
APICAL VIEWS (A4CH/A5CH/A2Ch)
The apical view is often difficult to attain, generally it is best gained with the patient in the left lateral decubitus position ( they do not have to be supine). In the clinical scenario positioning is often limited by the patients illness and potential distress.
The apical view is the most important view for doing more advanced haemodynamic assessments of cardiac and valvular function. It is also the best view to compare relative LV to RV size.
Probe position:
From the PSAX view the probe is moved down and lateral so that the transducer will interrogate from below the apex of the heart. In the left lateral decubitus position or in any supine position it is usually easiest to start the probe from the lateral chest wall near the bed in the 5-6th intercostal space (below the breast/mammary fold in a female).
The probe marker should be orientated towards the patients left axilla.
The depth should be increased from the parasternal views
Place the probe in the 5-6th IC space near the bed
Slide along the space medially until the apex is in view
Tilt the tail of the probe towards the bed to open up the 4 chamber view
Subtle rotation/tilt will be required too optimise the view
Ideally the interventricular septum should be orientated in the vertical midline of the image

A4CH view

RV- right ventricle, LV- left ventricle, TV- tricuspid valve, RA- right atrium, MV- mitral valve, LA- left atrium
For the A5CH view, from the A4CH view tilt the tail of the probe towards the bed/feet so the probe face is at a more acute angle to the chest.
A5CH view

RV- right ventricle, LV- left ventricle, LVOT - left ventricular outflow tract, LA- left atrium, AO- aorta, RA- right atrium
To attain the apical 2CH/3CH views from the A4CH position rotate anticlockwise 60-90 degrees orientating the probe marker between the L shoulder and mid clavicle.
The 2CH view shows the true anterior and inferior LV walls

A2CH view : LV- left ventricle, LA- left atrium
The 3CH view is obtained be rotating slightly from the 2CH view. The 3CH view reveals the aortic outflow/ aortic valve. The LV posterior wall and anteroseptal walls are now in view.

A3CH view: LV- left ventricle, LA- left atrium
A3CH
SUPRASTERNAL VIEW
The suprasternal view the cardiac probe is placed in the suprasternal notch:
Position the patients neck slightly extended and turn the head towards their left shoulder.
Place the probe with marker at 12 o’clock, rotate slowly clockwise towards the left shoulder
The aortic arch should be visible variable amounts of the ascending and descending aorta will be visible.
The aorta can be assessed for visible dilation/aneurysm, dissection, thrombus, flow and coarctation.
Suprasternal view
Suprasternal view - colour doppler

Suprasternal view (Source: modified from Prague ICU)

Suprasternal view (Source: umem.org)
SUBCOSTAL AND IVC VIEW
The subcostal view is often the easiest window for visualisation of the heart, especially in the situation of cardiac arrest, active CPR, and when multiple clinicians are accessing the patient. A significant amount of information can be attained with this single view, in particular: Looking for pericardial effusions, signs of cardiac activity, limited gross interpretation of LV function and of relative RV and LV sizes.
Position the probe in the epigastrium/slightly to the RUQ trying to use the liver as the acoustic window.
The probe marker is orientated to the patients left
Subcostal view

Subcostal view (Source: modified from Prague ICU)
For the IVC view rotate probe 90 degrees so that the probe marker is orientated to the patients head
IVC view

IVC view (Source: modified Prague ICU)
Bedside Qualitative Cardiac Assessment
Presence of pericardial effusion +/- signs of tamponade
Relative chamber sizes
Qualitative LV function and dynamic state , wall motion
Relative LV: RV size
Evident pathology/signs - D sign, McConnell sign, dissection flap
IVC
Integrate with other clinical/POCUS findings and patient state
plax VIEW
The PLAX view provides a "long axis" slice of the heart, allowing clinicians to make a rapid assessment of several critical aspects. In essence, a "gross assessment" from the PLAX view immediate visual check for major, life-threatening pathologies that require urgent attention.
Structures Visualised and Assessed:
Left Ventricular (LV) Function: A gross "eyeball assessment" of how well the LV is contracting is made. Hyper-dynamic motion might suggest hypovolemia (low fluid volume), while diminished contractility suggests impaired function (heart failure).
Pericardial Effusion: The space around the heart (pericardial sac) is examined for any abnormal accumulation of fluid. The location of the fluid relative to the descending aorta helps differentiate a pericardial effusion from a pleural effusion.
Valvular Abnormalities: The mitral valve and aortic valve are clearly visible. The assessment includes observing the motion, thickness, and calcification of the valve leaflets to detect gross issues like severe stenosis (narrowing) or regurgitation (leaking).
Aortic Root Assessment: The size of the proximal aorta and aortic root is visually assessed, (and often measured), to check for dilation or aneurysm, dissection flap.
Right Ventricular (RV) Size: The RV is the chamber closest to the transducer in this view. While its function isn't fully assessed here, its relative size compared to the LV can be noted.
Interventricular Septum: The thickness and motion of the septum (wall between the left and right ventricles) is assessed to look for hypertrophy or wall motion abnormalities.
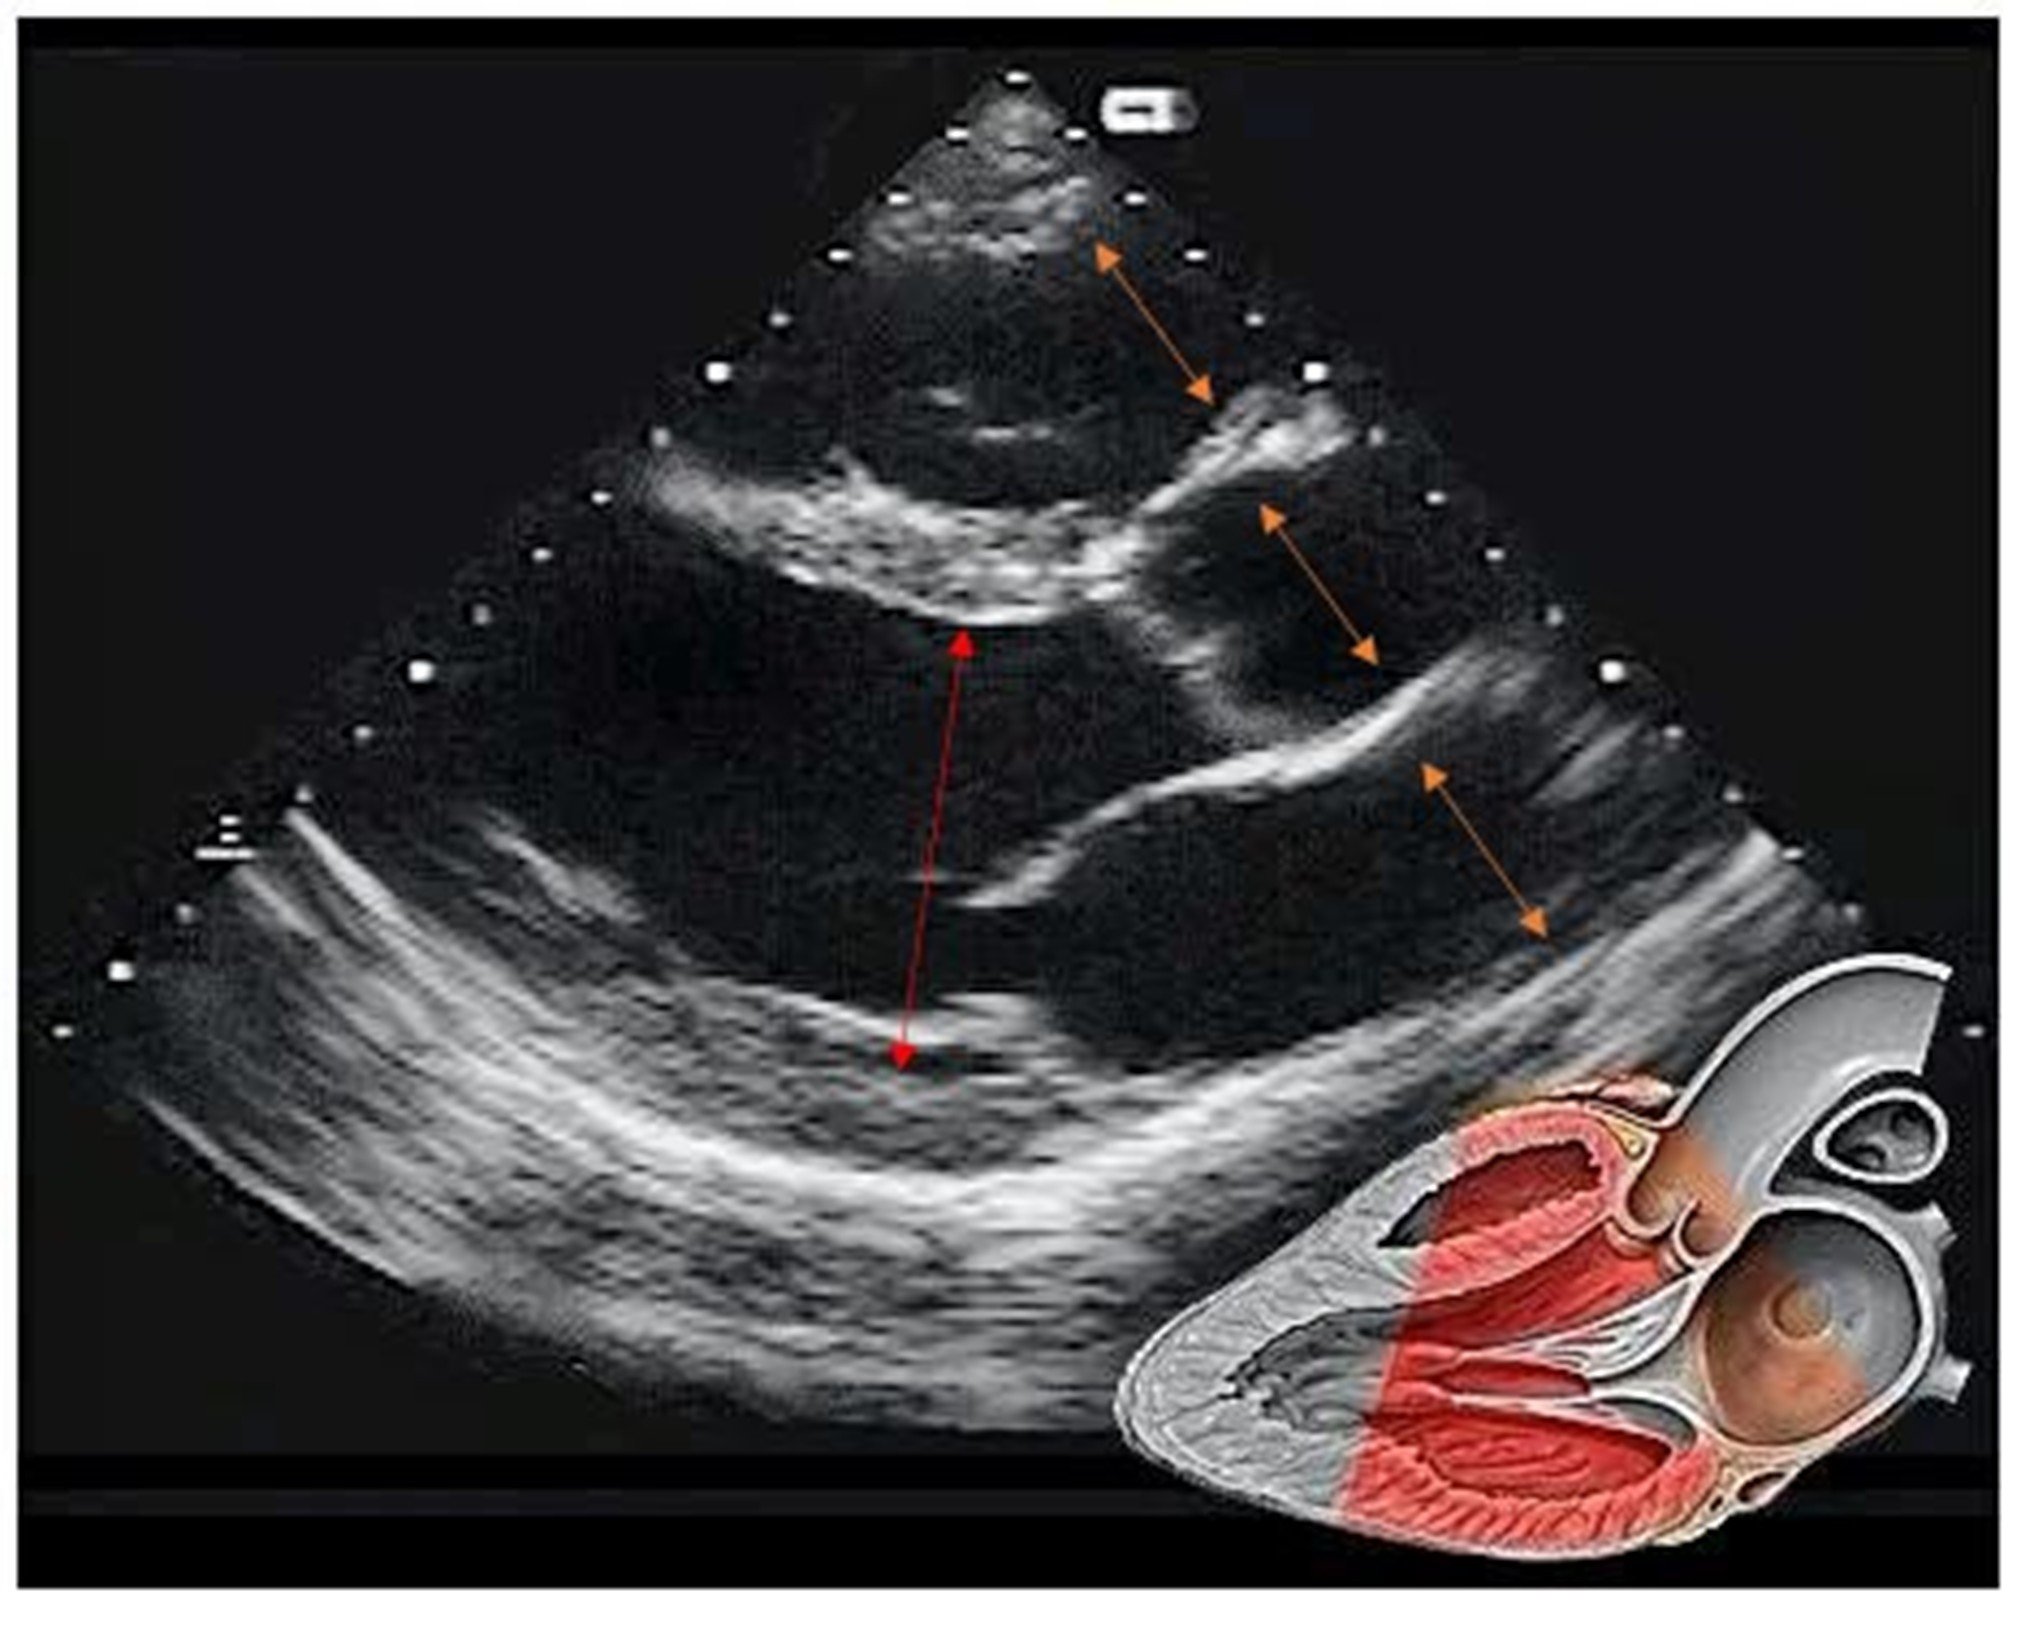
In the parasternal long axis view the RV-AORTA-LA should be approximately same dimension (ORANGE ARROWS)
Comparison of the relative dimensions can indicated abnormalities in one or more of these structures
The LV cavity (internal dimension) measure in end diastole (largest diameter in the cycle) can provide detail on LV dilation and size this can be done by gross comparison to the depth markers on the side of the image (white dash line - usually 1 cm increments)
Males > 5.8 cm and females > 5.2 cm considered dilated - anything measuring 6cm or more suggests a dilated LV
PSAX VIEW
Key Assessments in the PSAX View:
Left Ventricle (LV) Size and Shape: The LV should appear as a concentric circle or "donut" in cross-section at the papillary muscle level. An oval or "D" shape indicates pressure or volume overload from the right ventricle (RV).
Global LV Function: A gross qualitative assessment is made by visually inspecting the thickening of the LV walls during systole and the overall reduction in the chamber size. This is often described as "grossly normal", "mild-moderately impaired", or "severely impaired".
Right Ventricle (RV) Size and Pressure: The RV is typically a crescent-shaped structure adjacent to the LV. RV enlargement (RV dilatation) can cause the interventricular septum to flatten and push into the LV, making the LV appear "D-shaped". This "D-sign" can help distinguish between volume overload (D-shape in diastole) and pressure overload (maximal D-shape in systole).
Regional Wall Motion Abnormalities (RWMA): The PSAX view at the papillary muscle level allows for the assessment of various segments of the LV walls (anterior, septal, inferior, lateral/posterior) to identify areas of abnormal motion, which can indicate an infarction.
APICAL VIEW
Gross assessment in the apical 4-chamber view to look at chamber size, overall squeeze (function), and obvious valve issues or effusion.
Chamber Size and Comparison
Left Ventricle (LV) and Right Ventricle (RV): Visually compare their sizes. Normally, the LV is larger and more bullet-shaped (conical) than the RV. The RV internal diameter should be less than two-thirds the size of the LV.
RV should be 2/3 diameter to LV
RV 1:1 ratio indicates mod RV dilation
RV >1:1 ratio indicates severe RV dilation
Left Atrium (LA) and Right Atrium (RA): Assess if they are grossly normal in size or show signs of dilation.
Ventricular Function
Left Ventricular Function: A rapid, subjective estimation of systolic function (how well it is pumping) can be made visually. This involves observing the thickening of the LV walls and the inward motion of the endocardium towards the center of the cavity.
Right Ventricular Function: Assess the contractility of the RV. The tricuspid annulus motion is a key indicator.
Global Function: Compare the pumping action of the right side of the heart to the left side.
Valvular Assessment
Mitral Valve (MV) and Tricuspid Valve (TV): Observe the morphology and movement of the valve leaflets. The mitral annulus is normally situated slightly superior (closer to the transducer) to the tricuspid annulus.
SUBCOSTAL VIEW
Subcostal view provides an "acoustic window" through the liver to the heart and surrounding structures. A "gross assessment" from this view involves a rapid visual evaluation for major, life-threatening abnormalities, rather than detailed quantitative measurements.
Key elements of a gross assessment using the subcostal view include:
Pericardial Effusion: This is the primary focus of the subcostal view in emergency settings. The assessment looks for any echo-free (black) space, indicating fluid, between the liver and the right ventricle. The presence and size of the effusion are noted, along with signs of cardiac tamponade (e.g., right ventricular or right atrial collapse during diastole).
Global Cardiac Function: A visual estimation ("eyeballing") of the overall contractility and pumping strength of the left and right ventricles is performed (e.g., subjectively normal or depressed).
Chamber Size: The relative sizes of the four heart chambers (right atrium, left atrium, right ventricle, left ventricle) are assessed for gross enlargement or dilation.
Inferior Vena Cava (IVC) Assessment: By rotating the probe, the IVC can be visualized. A gross assessment of its size (distended or collapsed) and its dynamic changes with respiration helps estimate the patient's volume status and central venous pressure.
Aortic Assessment: The abdominal aorta can be visualized in both transverse and longitudinal planes to check for gross abnormalities like aneurysms or dissections.
Pleural Effusion: The view can also help identify a right-sided pleural effusion, visible as fluid superior to the diaphragm.
The subcostal view is especially valuable in critically ill patients, those who cannot be positioned in the left lateral decubitus position, or those with lung conditions (like COPD or emphysema) where other views are obscured by air in the lungs.
qUALITATIVE LV FUNCTION
LV function can be qualified as being normal or having mild-moderate-severe impairment. Differentiation of normal LV function vs severe is relatively easy. But mild and moderate impairment can be more challenging to interpret.
In the PLAX view:
Signs of good (normal) LV function
Mitral Valve Movement: The anterior leaflet of the mitral valve moves forward and makes contact with the interventricular septum during systole (sometimes called "septal slap"), indicating strong contraction and ejection of blood.
Wall Movement: The left ventricular walls and interventricular septum appear to thicken and shorten significantly with each heartbeat.
Mitral Valve Opening: The mitral valve opens widely in diastole, suggesting a large pressure gradient created by the ventricle contracting well.
Longitudinal Function: There is noticeable movement of the mitral valve annulus toward the apex of the heart.
Signs of poor LV function
Mitral Valve Movement: The anterior mitral leaflet does not reach the interventricular septum, and the mitral valve does not open as widely at the end of diastole.
Wall Movement: The left ventricular walls show reduced thickening and shortening.
Mitral Valve Opening: The lack of a wide opening in the mitral valve suggests impaired ejection, as the pressure gradient between the left atrium and ventricle is diminished.